Introduction
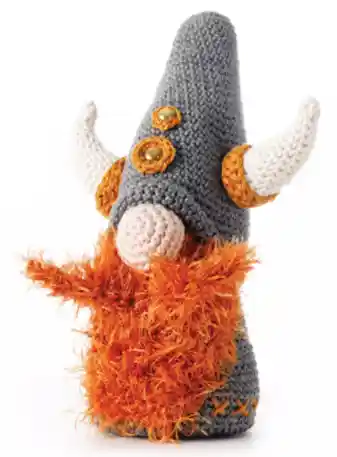
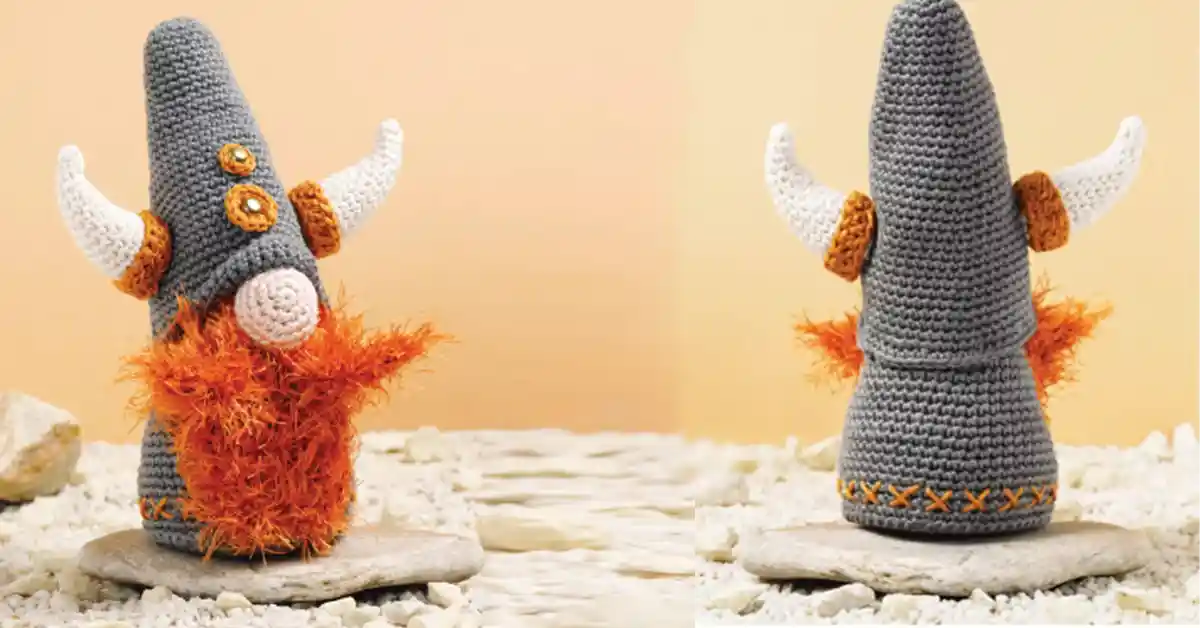
Crochet gnomes have quickly become a favorite among crafters and home decor lovers alike. With their quirky charm and customizable features, these little figures have found their way into seasonal displays, gift baskets, and cozy nooks all over the world. Among them, the Crochet Viking Gnome stands out with its bold Nordic flair—complete with a horned helmet, braided beard, and fearless personality.
Whether you’re a crochet enthusiast or just looking for a fun weekend project, this step-by-step, beginner-friendly tutorial is perfect for you. This Viking gnome adds a touch of Scandinavian spirit to your handmade creations and makes a wonderful handmade gnome gift for friends and family. It’s also an eye-catching piece of Nordic crochet decor that can stay on display all year round—or make a memorable addition to holiday setups.
In this post, you’ll find everything you need to bring your own amigurumi gnome warrior to life. We’ll walk you through the full materials list, guide you stitch by stitch through the process, and even share creative ideas for customizing your Viking gnome to match your style. Whether you’re making it for yourself or giving it away, this charming little figure is bound to become a favorite.
Ready to get started? Let’s grab those hooks and begin!
Table of Contents
- Introduction
- Why Make a Crochet Viking Gnome?
- Materials Needed
- Crochet Stitches & Abbreviations Used
- Step-by-Step Crochet Viking Gnome Pattern
- Assembly Instructions
- Customization Ideas
- Tips for Success & Troubleshooting
- Frequently Asked Questions
- Conclusion
Why Make a Crochet Viking Gnome?
There’s something truly special about creating a handmade piece that brings personality and warmth into a space—and the Crochet Viking Gnome does exactly that. With its whimsical charm and bold features, this little warrior is more than just a cute project. It’s a statement piece, whether you place it on a bookshelf, gift it to a loved one, or make it part of your seasonal decorations.
What sets this gnome apart is its Scandinavian-inspired design. From the Viking helmet and braided beard to the iconic little horns, every detail reflects Nordic folklore with a playful twist. It’s the perfect mix of cozy and adventurous—ideal for anyone who loves a bit of fantasy woven into their crochet projects.
Not only is this Viking gnome decoration a fun and unique gift, but it’s also a great way to celebrate the holidays with a creative touch. Picture it sitting next to your Yule decorations or even styled as a bold centerpiece for a themed event. Whether you’re looking for fantasy crochet ideas or a weekend craft that stands out, this project fits the bill.
No matter the season or occasion, this gnome brings joy, creativity, and a little Nordic magic to your crochet collection. And the best part? You can make it entirely your own.
Materials Needed
Before diving into your Viking adventure, let’s gather all the essential gnome crochet supplies you’ll need. This project is beginner-friendly, but using the right amigurumi tools and yarns will help bring out the best details in your little warrior.
Yarn:
- Scheepjes Panda yarn – approx. 7g in color 591 (ideal for creating a whimsical beard and mustache).
- Scheepjes Catona yarn – approx. 38g total:
- Gray 242 (main body and helmet)
- Cream 130 (horns)
- Gold/Brown 263 (embellishments like the belt or horn rim)
Tip: If Scheepjes yarn isn’t available locally, look for similar-weight cotton or fluffy yarns as substitutes—just be sure to stay consistent with texture and thickness.
Tools & Supplies:
- 2.5 mm crochet hook (for the main gnome structure)
- 4 mm crochet hook (for any fluffier parts or Panda yarn)
- Fiberfill stuffing (enough to firmly fill the body, nose, and horns)
- 2 split pins (used to attach decorative circles on the helmet)
- Scissors, yarn needle, and pins (basic amigurumi tools for assembly and finishing)
- Cardboard or plastic (cut to size and inserted in the foot base for structure)
Having everything ready before you start makes the process more enjoyable and helps your crochet Viking gnome come together smoothly. These small details—especially the choice of yarn color and hook size—really bring this character to life, so don’t be afraid to get creative while staying true to the original design.
Crochet Stitches & Abbreviations Used
Before you begin your crochet Viking gnome, it’s helpful to understand the basic stitches and abbreviations used throughout the pattern. If you’re a beginner, don’t worry—these are some of the most common stitches in amigurumi crochet.
Abbreviations:
- MR – Magic Ring (a method to begin crocheting in the round for a seamless start).
- sc – Single Crochet
- sc2tog – Single Crochet Two Together (a decrease stitch used to reduce the number of stitches).
- sl st – Slip Stitch (used to join rounds or finish neatly)
- tch – Turning Chain (used when turning your work)
Tip: New to any of these? You can find beginner-friendly video tutorials for each stitch online. Learning the magic ring and sc2tog will be especially helpful for shaping your gnome’s body and accessories.
With just these stitches, you’ll be able to complete the entire project smoothly!
Step-by-Step Crochet Viking Gnome Pattern
Ready to bring your Nordic friend to life? Let’s walk through each part of the crochet Viking gnome, from base to helmet! Whether you’re an experienced crocheter or a determined beginner, this step-by-step pattern breaks it all down with helpful tips along the way.
a. Body
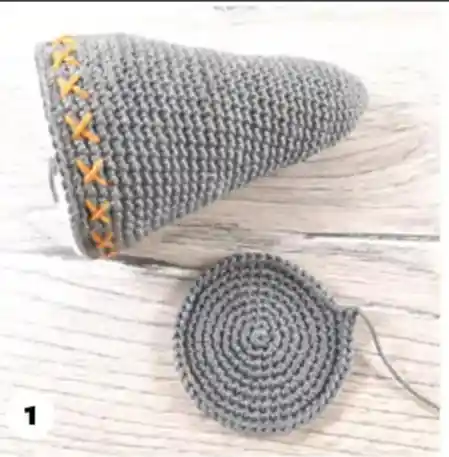
Start with Scheepjes Catona yarn in gray (color 242) and a 2.5 mm crochet hook.
- Make a Magic Ring (MR) and crochet 6 single crochet (sc) into it.
- Increase gradually round by round, following the original pattern until you reach 54 stitches.
- At Round 9, begin gently stuffing the body. Continue to add fiberfill stuffing as you go to maintain shape.
- After Round 37, fasten off and complete stuffing.
Tip: Keep your stitches tight and even to avoid gaps in the fabric.
🪡 Add golden brown embroidery crosses around the bottom using color 263. It’s a small detail, but it gives your DIY Viking gnome an authentic, handmade touch!
b. Bottom
Use the same gray yarn and create a flat circle using increases.
- After Round 9, you should have 54 stitches in a sturdy, even circle.
- Before sewing it to the body, cut out a cardboard or plastic circle just slightly smaller than your bottom base.
This will give your gnome added structure and stability, especially if it’s meant to stand on a shelf or table.
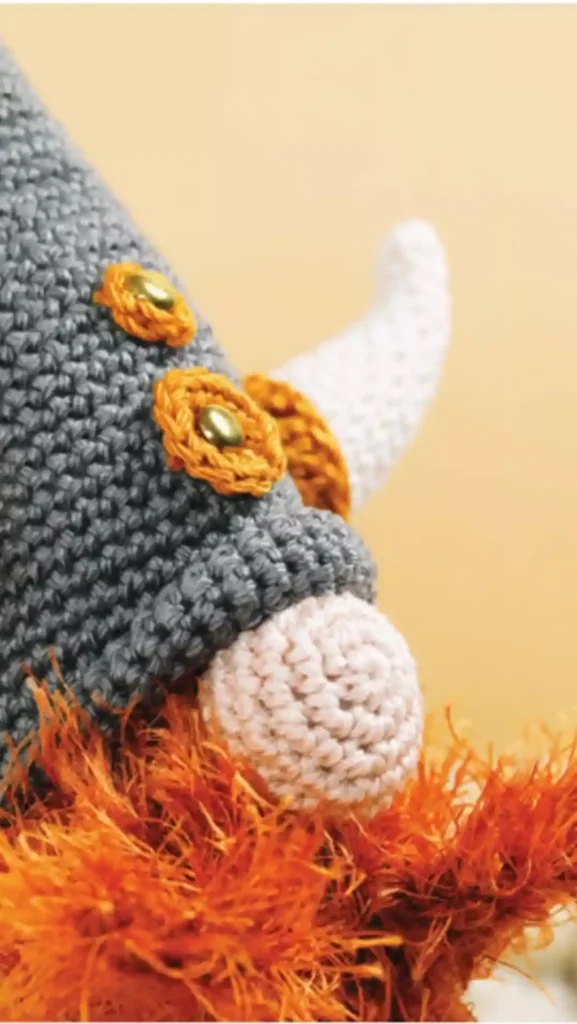
c. Nose
Using gold/brown (color 263), create a small round ball with increasing rounds, then decreasing to close.
- Stuff lightly before closing the last round.
- Attach the nose to the body, positioning it around Rounds 11–12 for a perfect fit.
📍 Tip: Nose placement is key! Align it with the center of the beard area to keep your gnome looking balanced and expressive.
d. Beard & Mustache
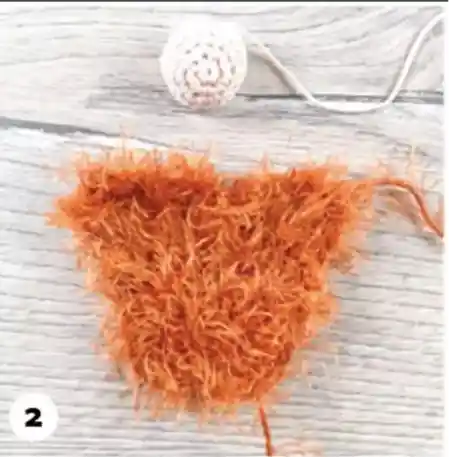
Use Scheepjes Panda yarn (color 591), a fluffy yarn that adds excellent texture to the beard.
Beard:
- Chain 15 and crochet in rows to form a triangular shape by gradually decreasing stitches.
- Finish off and sew beneath and to the sides of the nose.
Mustache:
- Chain 18 and work in rows to create a slim mustache.
- Sew it just beneath the nose, allowing it to rest gently over the beard.
🎨 Customization Ideas:
- Use white yarn for a Santa-style crochet gnome with a beard.
- Consider using faux fur yarn for added fluff and a touch of whimsy!
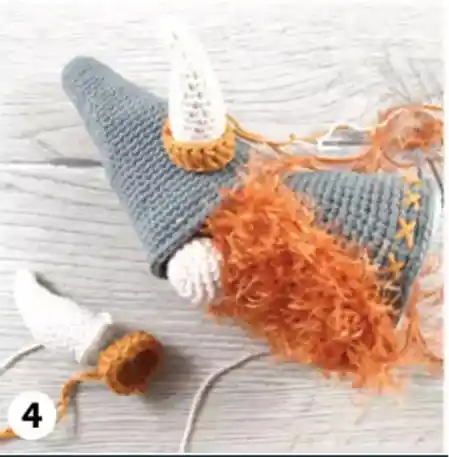
e. Helmet
Go back to the gray yarn with the 2.5 mm hook.
- Begin with a magic ring and crochet in the round, increasing gradually to shape your project.
- Continue through Round 37, ending with 54 stitches.
💡 The shaping of the helmet is where the Viking gnome decoration really comes to life. It fits snugly over the top of the body and looks authentically Norse.
- Conclude with a few slip stitches and then fasten off your work securely.
- Set aside—you’ll add the horns before attaching it to the gnome.
f. Horns (Make 2)
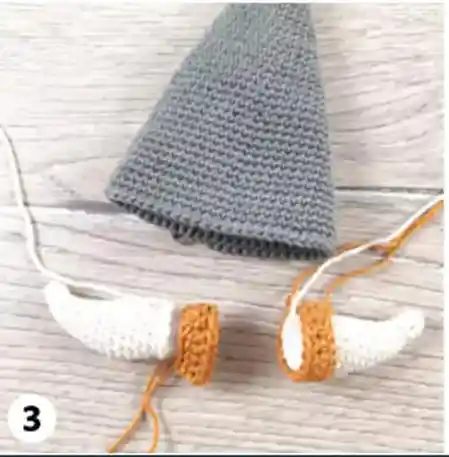
Using cream (color 130) and the 2.5 mm hook:
- Begin with a magic ring and work your way up to 14 stitches.
- Lightly stuff the horn as you go to help it hold its curved shape.
✂️ Tip: Don’t over-stuff the horns—they should be firm but slightly flexible.
Attach the horns:
- Sew them securely to the sides of the helmet.
- Use stitch markers to ensure they are evenly positioned and symmetrical.
g. Decorative Circles (with Split Pins)
You’ll crochet two small circles:
- Circle 1: 6 sc in a magic ring, slip stitch to join.
- Circle 2: 6 sc in MR, then increase (2 sc in each) to make 12.
Pass a split pin through each circle. These resemble Viking helmet rivets or armor details and add a playful historical touch.
🛡️ Pro Tip: Position the circles on either side of the helmet and secure them with the split pins. It’s a small addition that makes your crochet Viking gnome even more impressive.
Once all elements are completed and attached, use pins to position the helmet properly on the head. Then, sew it in place with a few strong stitches.
🎉 Congratulations—you’ve finished your Viking gnome! Whether he’s guarding your home or gifting his warrior charm to someone else, you’ve created a timeless and adorable piece of Scandinavian crochet decor.
Assembly Instructions
Now that you’ve crocheted all the parts, it’s time to bring your Viking gnome together! Follow this assembly guide for a balanced and sturdy finish.
1. Positioning and Attaching the Nose:
- Start by placing the nose onto the body at Rounds 11–12. Make sure it’s centered with the face and slightly above the bottom of the beard. This placement helps create that iconic Viking gnome look.
- Sew it securely using a needle and yarn. Be sure to sew tightly around the edges to avoid any shifting.
2. Attaching the Beard and Mustache:
- For the beard, position it beneath the nose, ensuring it covers a good portion of the bottom half of the face. The beard should extend to the sides of the nose, giving the gnome a full, bushy look.
- For the mustache, sew it just below the nose, with the edges resting slightly over the top of the beard. Make sure it’s centered for a balanced appearance.
Tip: Pin the beard and mustache in place before sewing to make sure they’re positioned evenly.
3. Sewing on the Helmet:
- The helmet should sit snugly on the gnome’s head, resting just above the nose. You may need to adjust the placement to ensure it looks balanced.
- Use a needle and your gray yarn to sew the helmet securely to the head, using tight stitches to keep it in place.
4. Stuffing Tips for a Balanced Gnome:
- As you assemble, make sure your gnome is stuffed evenly. Start with the body, adding stuffing bit by bit as you work. Don’t over-stuff, or it will become too firm and lose its shape. Keep the gnome’s base solid but not overly firm for stability.
- For the bottom, place your cardboard or plastic insert to add structure and help the gnome stand upright.
5. Finishing Touches:
- After everything is attached, double-check the positioning of all parts to ensure your Viking gnome construction is balanced and secure.
Now your gnome is ready for display or gifting!
Customization Ideas
Once you’ve mastered the basic Viking gnome, there are endless ways to personalize your crochet creation! Here are some DIY crochet gnome ideas to spark your creativity:
1. Seasonal Gnomes:
- Christmas Viking Gnome: Use red, green, and white yarn for a festive twist. Add a small Santa hat or a Nordic pattern on the helmet to make it more holiday-themed.
- Halloween Viking Gnome: Go for darker shades like orange, black, and purple. Consider using spooky details like pumpkin or bat designs on the helmet, or add a ghostly touch to the beard with white yarn.
2. Female Viking Gnome Version:
- Switch out the traditional beard for braids! Instead of the bushy facial hair, create two braids for the gnome’s hair. Add a little bow or beads to the braids for extra flair, and customize the color to make her stand out.
- You can also make her more feminine by adding floral embellishments to the helmet or incorporating a soft pastel palette for the clothing and accessories.
3. Turn It Into a Hanging Ornament or Keychain:
- If you’re looking for a unique amigurumi style, transform your Viking gnome into a small hanging ornament or keychain. Simply add a loop of yarn to the top of the helmet and hang it from your favorite tree or attach it to your keys.
- This customization makes it a great personalized crochet gift for the holidays or as a fun decoration year-round.
With these fun twists, your crochet Viking gnome can become a personalized piece of art for any occasion!
Tips for Success & Troubleshooting
Even the most experienced crocheters encounter challenges, so here are a few troubleshooting tips to help you with your crochet gnome pattern:
1. The Helmet Doesn’t Fit Right:
- If the helmet feels too big or too small, try adjusting your tension. Make sure you’re using the right crochet hook size (4 mm), and check your stitch count.
- If it’s too tight, you can add a few extra rows in the beginning to give it more room. If it’s too loose, try reducing the stitch count slightly or adjusting the shape with more stitches.
2. The Beard Looks Uneven:
- If your beard seems uneven, try trimming it gently to even out the edges. You can also reposition the beard and mustache by loosening the stitches and shifting them for a more balanced look.
- If the yarn is too thick or too thin, experiment with different types of fluffy or softer yarns for a fuller beard.
3. The Gnome Won’t Stand Upright:
- If your gnome keeps tipping over, ensure you’ve stuffed the body evenly and placed the cardboard/plastic insert in the bottom for extra stability.
- You can also try adding more stuffing to the feet or making them a bit firmer to help them stand upright better.
These simple tips should help with common issues. Happy crocheting!
Frequently Asked Questions
1. Can I use different yarns?
Yes! While the Scheepjes Panda and Scheepjes Catona yarns are recommended for this project, you can use any yarn you like. Just keep in mind that different yarns may affect the size and texture of your crochet Viking gnome. Adjust your hook size accordingly to match the yarn’s thickness.
2. How can I adapt my project with just a 3 mm hook?
Using a 3 mm hook will result in a smaller gnome, which can be a fun variation! Just remember that your stitches may be tighter, so make sure to adjust the tension to ensure the gnome still holds its shape.
3. Can I make the gnome larger?
Yes! To boost the size, just switch to thicker yarn and a larger hook. Keep in mind that you will need to adjust your stitch counts and rows to maintain the proportions of the gnome’s body, helmet, and beard.
4. How long does it take to complete?
On average, this crochet pattern can take anywhere from 4 to 6 hours to complete, depending on your crochet speed and experience. If you’re a beginner, it might take a bit longer, but the process is fun and rewarding!
Conclusion
Creating your own crochet Viking gnome is not just a fun project but a chance to add a personal touch to your home decor or gift collection. The unique combination of Nordic details—like the Viking helmet, beard, and horns—makes this pattern a standout piece for any occasion. Whether you’re a beginner or an experienced crocheter, this project is sure to bring a sense of accomplishment and joy.
Now, it’s time to show off your masterpiece! Share your creations on Pinterest or Instagram with the hashtag #CrochetVikingGnome so we can see your lovely designs. If you enjoyed this pattern, be sure to subscribe for more creative crochet ideas and tutorials.
Got questions or ideas? Drop a comment below—I’d love to hear how your gnome turned out or any fun customizations you’ve added!
Don’t forget to pin this pattern or share it with a fellow crochet lover!