Introduction
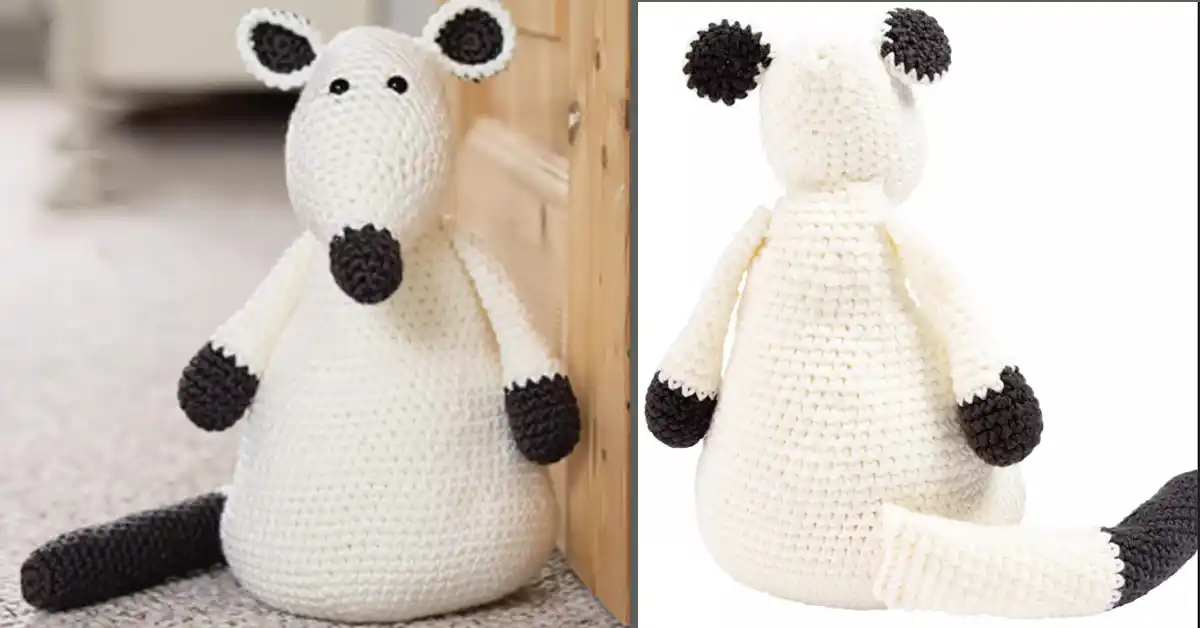
There’s something irresistibly charming about a handmade crochet mouse. Whether you’re making a cozy toy for a child, a whimsical piece of home décor, or a thoughtful handmade gift, this little project is sure to bring a smile. Soft, squishy, and full of personality, crochet mice are a favorite among crafters for a reason—they’re adorable, quick to make, and totally customizable.
In this free, beginner-friendly, step-by-step pattern, you’ll learn how to crochet a mouse from start to finish using simple stitches. We’ll guide you through each part, from the cute little nose to the long, flexible tail. Even if you’re new to amigurumi or have never crocheted a plush toy before, this pattern is designed to be easy to follow and fun to complete.
What makes this crochet mouse even more special is its structure. We’ll add a small bag of rice inside the body to give it a bit of weight, which helps it sit nicely and feel extra cuddly in your hands. It’s perfect as a desk buddy, shelf display, or soft bedtime companion.
For the yarn, we’re using Scheepjes Chunky Monkey in two classic shades—Cream (1005) and Dark Grey (2018)—which gives the finished mouse a soft, plush look and feel. The result? A squishy, huggable little friend that’s just as fun to make as it is to give (or keep!).
So grab your hook, gather your supplies, and let’s get started on this charming crochet mouse!
Table of Contents
- Introduction
- Materials You’ll Need
- Stitch Abbreviations & Notes
- HEAD (with Nose)
- BODY
- EARS (Make 2)
- ARMS (Make 2)
- TAIL
- Assembling Your Crochet Mouse
- Customization Ideas
- Frequently Asked Questions (FAQ)
Materials You’ll Need
Before you dive into crocheting your adorable mouse, it’s important to have all your materials ready. This project uses basic crochet tools, plush yarn, and simple items to give your mouse its soft yet stable feel. Here’s everything you’ll need:
Yarn & Tools
- Scheepjes Chunky Monkey Yarn
– 2 balls in Cream (1005)
– 1 ball in Dark Grey (2018) - 5 mm crochet hook
- Stitch marker
- Yarn needle
- Scissors
Stuffing & Structure
- Fiberfill stuffing – for softness and shape
- 500 g of rice – for weight
- Plastic bag – to hold the rice securely
- 2 safety eyes
Helpful Tips:
- Why Scheepjes Chunky Monkey?
This yarn is not only anti-pilling and super soft, but it also works up quickly thanks to its chunky weight—perfect for amigurumi like this crochet mouse! - Choosing Safety Eyes:
For a polished and safe finish, use plastic safety eyes (8–10 mm works well). They’re easy to install and stay secure, especially if you’re making this for a child (but always supervise play if gifting to young kids). - Sealing the Rice Bag:
Fill a small plastic bag with rice, tie it tightly (or seal it with tape or a zip closure), and place it at the base of the body. This helps your mouse sit upright and adds a pleasant weighted feel.
Now that your materials are ready, let’s move on to the fun part—crocheting your mouse!
Stitch Abbreviations & Notes
Before we begin, let’s go over some basic crochet abbreviations you’ll see throughout this pattern. If you’re a beginner, don’t worry—these are simple stitches that are easy to learn and remember.
Mini Glossary
- MR – Magic Ring (a method for beginning crocheting in the round).
- sc – Single Crochet
- sc2tog – Single Crochet Two Together (a technique for decreasing stitches).
- sl st – Slip Stitch
These are the only stitches you’ll need to create your crochet mouse!
Important Notes:
- This pattern is worked in continuous spiral rounds. That means you won’t join your rounds with a slip stitch—just keep crocheting in a circle.
- To mark the beginning of each round, utilize a stitch marker for easy reference. Move it up after each round so you don’t lose your place.
- When starting with the magic ring (MR), make sure it’s pulled tight to avoid a hole in the center of your work.
Now that you’re familiar with the stitches and structure, you’re ready to start creating the head of your crochet mouse!
HEAD (with Nose)
Creating the amigurumi mouse head begins with a cute little nose using Dark gray yarn, followed by building out the round head in Cream. This section also includes fiberfill stuffing and adding safety eyes to give your mouse its sweet expression.
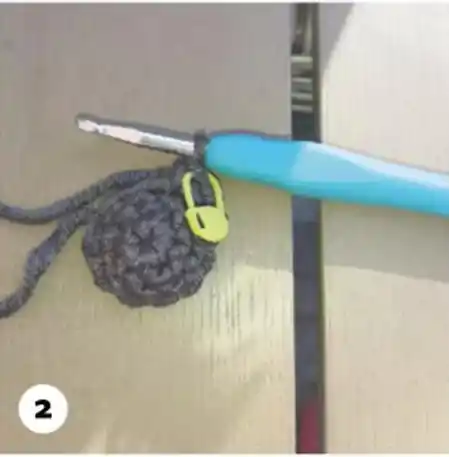
Nose – Dark Grey (Rounds 1–6)
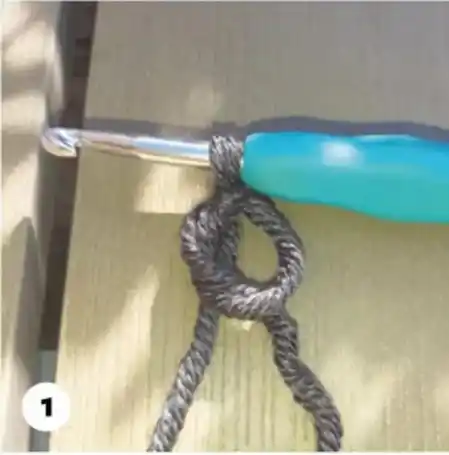
- Round 1: Start with a Magic Ring (MR). Work 6 sc into the MR. (= 6)
- Round 2: 1 sc, 2 sc in next stitch, repeat around (= 9)
- Round 3: 2 sc, 2 sc in next stitch, repeat around (= 12)
- Round 4: 12 sc
- Round 5: 2 sc, sc2tog, repeat around (= 9)
- Round 6: 9 sc
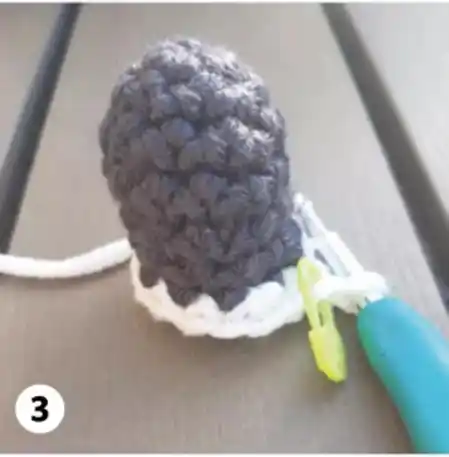
Switch to Cream (1005) yarn to begin the head.
Head – Cream (Rounds 7–33)
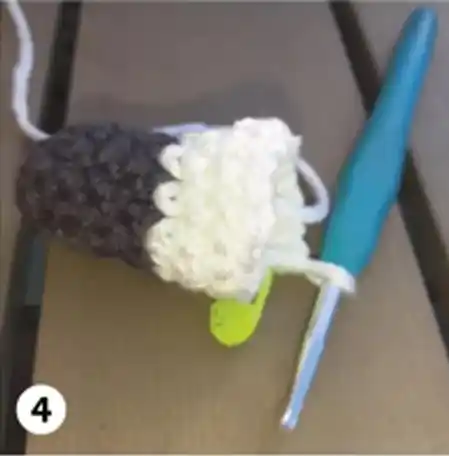
- Round 7: 2 sc, 2 sc in next stitch, repeat around (= 12)
- Round 8: 3 sc, 2 sc in next stitch, repeat around (= 16)
- Round 9: 16 sc
- Round 10: 4 sc, 2 sc in next stitch, repeat around (= 18)
– 📌 Tip: Lightly stuff the nose now - Round 11: 5 sc, 2 sc in next stitch, repeat around (= 21)
- Round 12: 21 sc
- Round 13: 6 sc, 2 sc in next stitch, repeat around (= 24)
- Round 14: 7 sc, 2 sc in next stitch, repeat around (= 27)
- Round 15: 27 sc
- Round 16: 8 sc, 2 sc in next stitch, repeat around (= 30)
- Round 17: 9 sc, 2 sc in next stitch, repeat around (= 33)
- Round 18: 33 sc
- Round 19: 10 sc, 2 sc in next stitch, repeat around (= 36)
- Round 20: 36 sc
– 📌 Tip: Insert safety eyes between Rounds 16–18, about 6–7 stitches apart
Start Decreasing
- Round 21: 10 sc, sc2tog, repeat around (= 33)
- Round 22: 9 sc, sc2tog, repeat around (= 30)
23–24. Rounds 23–24: 30 sc - Round 25: 8 sc, sc2tog, repeat around (= 27)
- Round 26: 27 sc
- Round 27: 7 sc, sc2tog, repeat around (= 24)
– Begin stuffing the fiberfill into the head as you go - Round 28: 6 sc, sc2tog, repeat around (= 21)
- Round 29: 5 sc, sc2tog, repeat around (= 18)
- Round 30: 4 sc, sc2tog, repeat around (= 15)
- Round 31: 3 sc, sc2tog, repeat around (= 12)
- Round 32: 2 sc, sc2tog, repeat around (= 9)
- Round 33: 1 sc, sc2tog, repeat around (= 6). Join with sl st and fasten off.
Your amigurumi mouse head is now complete and ready to attach to the body later.
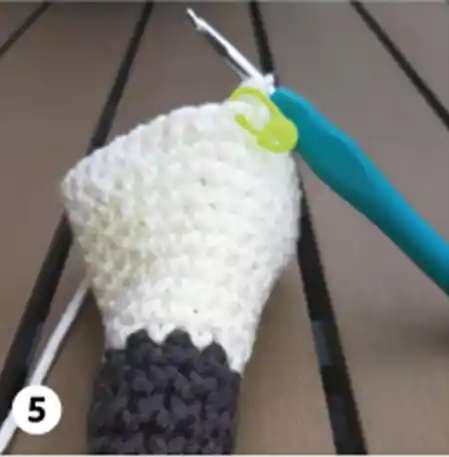
BODY
The stuffed crochet mouse body works entirely in cream yarn using spiral rounds. You’ll add a rice-filled plastic bag near the base to provide weight and stability, giving your finished mouse a wonderful, plush feel.

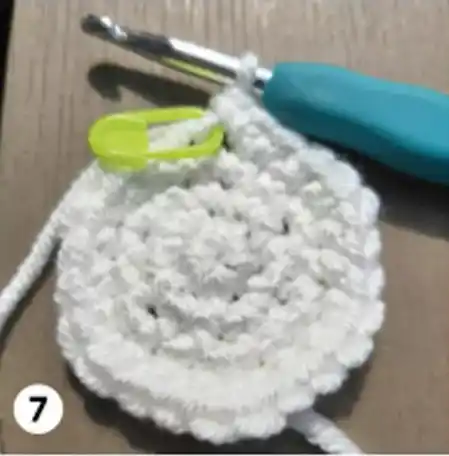
Rounds 1–13: Building the Base
- Round 1: MR, 6 sc
- Round 2: 2 sc in each stitch (= 12)
- Round 3: 1 sc, 2 sc in next stitch, repeat around (= 18)
- Round 4: 2 sc, 2 sc in next stitch, repeat (= 24)
- Round 5: 3 sc, 2 sc in next stitch, repeat (= 30)
- Round 6: 4 sc, 2 sc in next stitch, repeat (= 36)
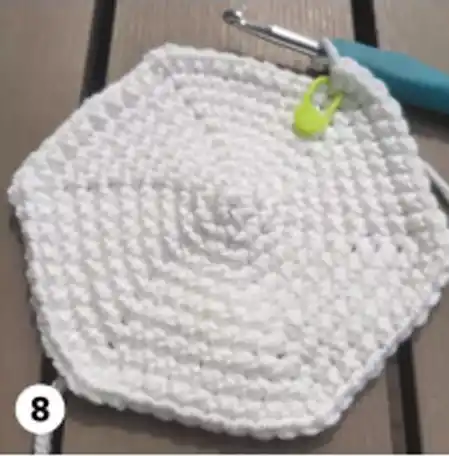
- Round 7: 5 sc, 2 sc in next stitch, repeat (= 42)
- Round 8: 6 sc, 2 sc in next stitch, repeat (= 48)
- Round 9: 7 sc, 2 sc in next stitch, repeat (= 54)
- Round 10: 8 sc, 2 sc in next stitch, repeat (= 60)
- Round 11: 9 sc, 2 sc in next stitch, repeat (= 66)
- Round 12: 10 sc, 2 sc in next stitch, repeat (= 72)
- Round 13: 11 sc, 2 sc in next stitch, repeat (= 78)
Rounds 14–43: Shape, Weight, & Close


14–18. Rounds 14–18: 78 sc
- Round 19: 11 sc, sc2tog, repeat (= 72)
- Round 20: 72 sc
– 📌 Tip: Now insert a tuft of fiberfill stuffing into the bottom - Round 21: 72 sc
- Round 22: 10 sc, sc2tog, repeat (= 66)
- Round 23: 66 sc
- Round 24: 9 sc, sc2tog, repeat (= 60)
25–26. Rounds 25–26: 60 sc
– ✨ Insert the sealed rice bag now, sitting on top of the fiberfill
– Continue stuffing around the rice to get a smooth, rounded stuffed crochet mouse belly
- Round 27: 8 sc, sc2tog, repeat (= 54)
28–29. Rounds 28–29: 54 sc - Round 30: 7 sc, sc2tog, repeat (= 48)
31–32. Rounds 31–32: 48 sc - Round 33: 6 sc, sc2tog, repeat (= 42)
34–35. Rounds 34–35: 42 sc - Round 36: 5 sc, sc2tog, repeat (= 36)
37–38. Rounds 37–38: 36 sc - Round 39: 4 sc, sc2tog, repeat (= 30)
- Round 40: 30 sc
- Round 41: 3 sc, sc2tog, repeat (= 24)
- Round 42: 24 sc
- Round 43: 2 sc, sc2tog, repeat (= 18)
– 📌 Tip: You can add or remove stuffing to adjust how plump you want the body to be
– Do not close the top—this is where you’ll attach the head
Fasten off with a slip stitch and leave a long tail for sewing the amigurumi mouse head onto the body.
EARS (Make 2)
These amigurumi mouse ears are small and round, made with a seamless color change from Dark Grey to Cream.
- Round 1: MR, 6 sc in Dark Grey (= 6)
- Round 2: 2 sc in each stitch (= 12)
- Round 3: 1 sc, 2 sc in next stitch, repeat (= 18)
- Round 4: Switch to Cream and work 18 sc. Join with sl st. – Leave a long tail for sewing
– 📌 Tip: Use pins to test ear placement before sewing to make sure they’re even
ARMS (Make 2)
These cute little crochet mouse limbs are simple and beginner-friendly.
- Round 1: MR, 6 sc in Dark Grey
- Round 2: 2 sc in each stitch (= 12)
- Round 3: 2 sc, 2 sc in next stitch, repeat (= 16)
- Round 4: 16 sc
- Round 5: 2 sc, sc2tog, repeat (= 12)
- Round 6: 12 sc
– Switch to Cream
– Lightly stuff the base only - Round 7: 12 sc
- Round 8: 2 sc, sc2tog, repeat (= 9)
9–19. Rounds 9–19: 9 sc – Do not stuff the rest. Flatten the open end and close with 3 sc
– Leave a tail for sewing
TAIL
The crochet mouse tail is elongated, slender, and gently filled. You can customize the tail length to your liking.
- Round 1: MR, 6 sc in Dark Grey
- Round 2: 2 sc in each stitch (= 12)
3–25. Rounds 3–25: 12 sc
– Optional Switch to Cream after Round 25 for a cute two- tone look that adds redundant character.
Rounds 26–41: Work 12 single crochets (sc) in each round. Lightly stuff as you go to maintain shape.
– Once you reach your desired length, gently flatten the tail and securely close it off.
– Keep a long tail and stitch it firmly at the back.
Assembling Your Crochet Mouse
Now that all your pieces are ready, it’s time to bring your adorable plush mouse to life! This step involves sewing amigurumi parts together with care to ensure everything is balanced and securely attached.
1. Attach the Head to the Body
- Position the head on top of the open neck of the body.
- Make sure it’s centered and slightly tilted forward for a cute expression.
- Use the long tail from the body or head to sew in a firm, tight circle.
- Add a bit more stuffing through the neck if needed before fully closing.
2. Attach the Ears
- Place ears on both sides of the head, slightly angled back.
- Use pins to test the position first—symmetry is key.
- Sew them down using the long yarn tails left from the ears.
3. Sew the Arms
- Place the arms slightly toward the front of the body, just under the head.
- Attach them so they curve slightly outward or downward, depending on the look you want.
- Make sure both arms are evenly placed.
4. Attach the Tail
- Sew the tail to the center back of the lower body.
- Tilt it slightly to one side if you want extra personality.
Assembly Tips:
- Preview placement with pins before committing to sewing.
- Tuck all yarn tails inside the body for a clean finish.
- Gently shape the mouse as you go to ensure it stands or sits nicely.
Your cozy crochet mouse is now fully assembled and ready to charm!
Customization Ideas
One of the best parts about making a handmade plush animal is the freedom to make it uniquely yours! There are so many ways to customize your crochet mouse to match your style or to suit a special occasion or recipient.
Color Variations:
- Try a gray and white combination for a classic look, or swap out the colors entirely for a more whimsical mouse.
- Want to add a touch of cuteness? Use pink yarn for the nose or inner ears.
- Go soft and dreamy with pastel tones—think baby blue, blush pink, or lavender.
Add Charming Accessories:
- Crochet a tiny scarf in a bright color to give your mouse a cozy winter look.
- Add a mini bowtie or a tiny top hat for a dapper touch—perfect for gifting or decoration.
- You could even create little clothing pieces if you enjoy a challenge!
Size Adjustments:
- For a mini version, simply use a smaller crochet hook and finer yarn. This makes a great keychain or pocket-sized gift.
Gift Ideas:
This little crochet mouse makes a thoughtful and personalized present. Try these ideas:
- A soft baby toy with embroidered eyes instead of safety eyes
- Nursery decor in pastel shades to match the theme
- A cute desk mascot to add a cheerful touch to someone’s workspace.
- A heartwarming handmade gift for birthdays, holidays, or just because!
No matter how you customize it, your crochet mouse will have its own personality and charm—just like the hands that made it!
Frequently Asked Questions (FAQ)
Can beginners crochet this mouse?
Yes! This crochet mouse pattern is perfect for beginners. It uses basic stitches and includes a step-by-step guide to walk you through the process. If you can single crochet in the round, you’re ready to make this plush little friend.
What yarn is best for a crochet mouse?
We highly recommend using Scheepjes Chunky Monkey yarn. It’s soft, anti-pilling, and gives your mouse a cozy, plush feel. Plus, it’s easy to work with and comes in lots of beautiful colors.
How do I add weight to an amigurumi mouse?
To make your mouse sit upright and feel more huggable, fill a plastic bag with rice, seal it tightly, and insert it into the body before stuffing with fiberfill. This simple trick adds structure and stability.
What size safety eyes should I use for a crochet mouse?
Most crafters use 9mm to 12mm safety eyes for this project. Choose the size based on how expressive or cute you want your mouse to look.
Can I sell crocheted mice made from this pattern?
Yes, you’re welcome to sell finished mice made from this pattern. Just be sure to credit the original designer, and please don’t share or redistribute the pattern itself.