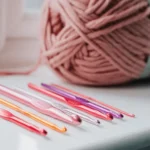
Winter brings chilly temperatures, and for many, that means cold hands—whether you’re outdoors, working at a desk, or relaxing at home. Instead of settling for discomfort, why not craft your own hand crochet accessories for a stylish and practical solution?
This guide will walk you through a step-by-step pattern for making warm Hand Crochet Accessories using merino wool yarn and a 5.5mm crochet hook. The soft and insulating nature of MillaMia Naturally Soft Aran makes it the perfect choice for keeping your hands cozy.
Even if you’re a beginner, this project is easy to follow! You’ll learn how to combine star stitch and double crochet to create a beautiful yet functional design. Whether you’re making these mitts for yourself or as a thoughtful handmade gift, you’ll love how quick and rewarding this crochet project is. Let’s get started!
Table of Contents
- Materials Needed
- Why Choosing the Right Yarn Matters
- Understanding the Crochet Techniques
- 1. Star Stitch
- 2. Double Crochet (dc) – Used for Cuffs
- 3. Tips for Joining Rounds & Working in Rows Seamlessly
- Step-by-Step Hand Crochet Accessories Pattern
- A. Making the Cuffs
- B. Crocheting the Main Mitt Section
- C. Finishing Touches
- Styling and Practical Uses
- Care Instructions for Your Crochet Mitts
- Conclusion
Materials Needed
Before you start Hand Crochet Accessories, gather all the necessary materials to ensure a smooth and enjoyable experience.
1. Yarn
For this project, you’ll need MillaMia Naturally Soft Aran, a 100% merino wool yarn that provides excellent warmth, softness, and durability. Merino wool is an ideal choice for winter accessories because it offers natural insulation, keeping your hands warm while remaining breathable.
You will need one ball (50g/80m) of each color:
- Yarn A: Shocking Pink (244)
- Yarn B: Teal (231)
- Yarn C: Oat (228)
2. Crochet Hook
- 5.5mm (US I/9) crochet hook – This size helps create the perfect tension for a snug yet comfortable fit.
3. Buttons
- Two small wooden buttons (or any 2cm diameter buttons) – These add a stylish touch while helping to secure the mitts.
Why Choosing the Right Yarn Matters
- Merino wool is naturally warm and soft, making it perfect for accessories that touch your skin.
- It’s breathable and moisture-wicking, preventing sweaty hands.
- Aran-weight yarn provides the right thickness for warmth without making the mitts feel bulky.
By using the right materials, you’ll create a high-quality, cozy pair of mitts that are both functional and stylish. Now that you have everything ready, let’s move on to the crochet techniques!
Understanding the Crochet Techniques
To create these warm and cozy mitts, you’ll use two key crochet stitches: star stitch for the main mitt section and double crochet (dc) for the cuffs. Below is an overview of each technique, along with tips for seamless construction.
1. Star Stitch
The star stitch creates a beautiful textured pattern that adds warmth and visual appeal to your mitts. This stitch is worked in two rows:
- First row: You create the foundation by pulling up loops and forming the “star.”
- Second row: You work half-double crochets (hdc) into the eye of each star, completing the stitch pattern.
How to Crochet the Star Stitch:
- Place your hook into the second chain away from the hook and draw up a loop.
- Insert your hook into the next four chains, pulling up a loop each time (you should have six loops on your hook).
- Wrap the yarn over and pull through all six loops on your hook, then chain one to secure the star.
- Repeat the process across the row.
2. Double Crochet (dc) – Used for Cuffs
The double crochet stitch is used to make the cuff of the mitts, providing a stretchy and structured base.
Why Use Double Crochet for Cuffs?
- It creates a sturdy and flexible foundation for a comfortable fit.
- The stitch works up quickly, making it ideal for beginners.
- When worked in the round, it forms a seamless, even texture.
How to Crochet Double Crochet (dc):
- Yarn over, insert your hook into the stitch, and pull up a loop (3 loops on hook).
- Yarn over and pull through the first two loops (2 loops left).
- Yarn over again and pull through the remaining two loops.
3. Tips for Joining Rounds & Working in Rows Seamlessly
- Joining Rounds Without Gaps:
- Always slip stitch into the first stitch (not the chain) to keep the seam invisible.
- If using star stitch in the round, omit the slip stitch and continue working in a spiral to avoid seams.
- Keeping Rows Even:
- Always count stitches at the end of each row to maintain consistency.
- For straight edges, turn your work properly and keep tension even.
By mastering these techniques, you’ll be able to crochet a warm, stylish, and seamless pair of mitts. Now, let’s move on to the step-by-step pattern!
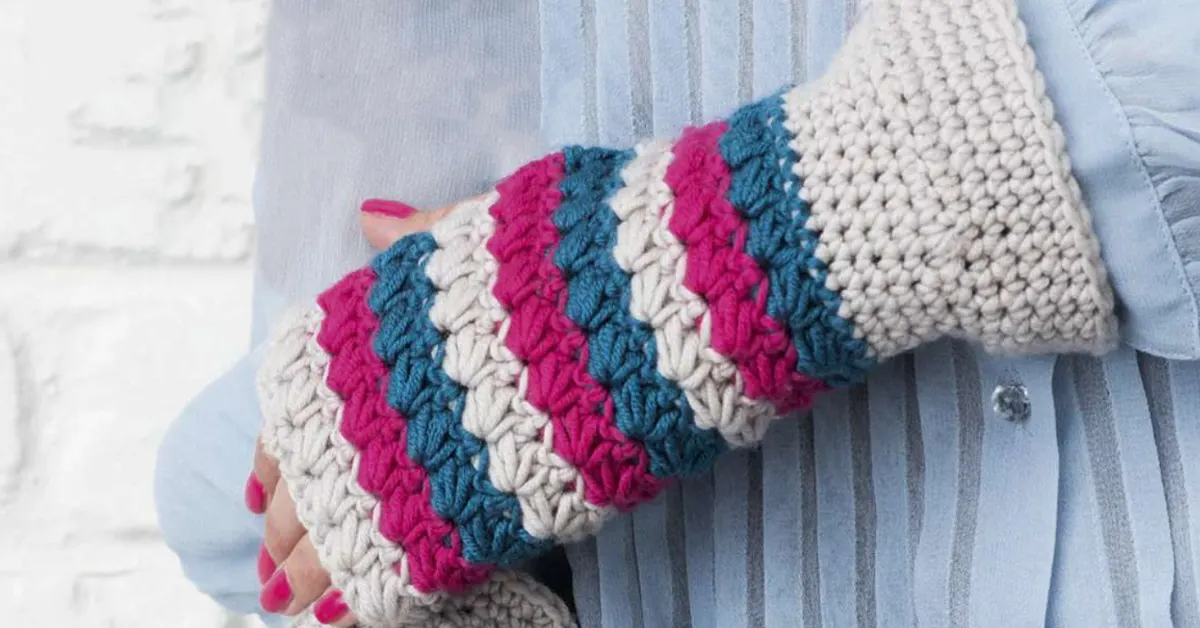
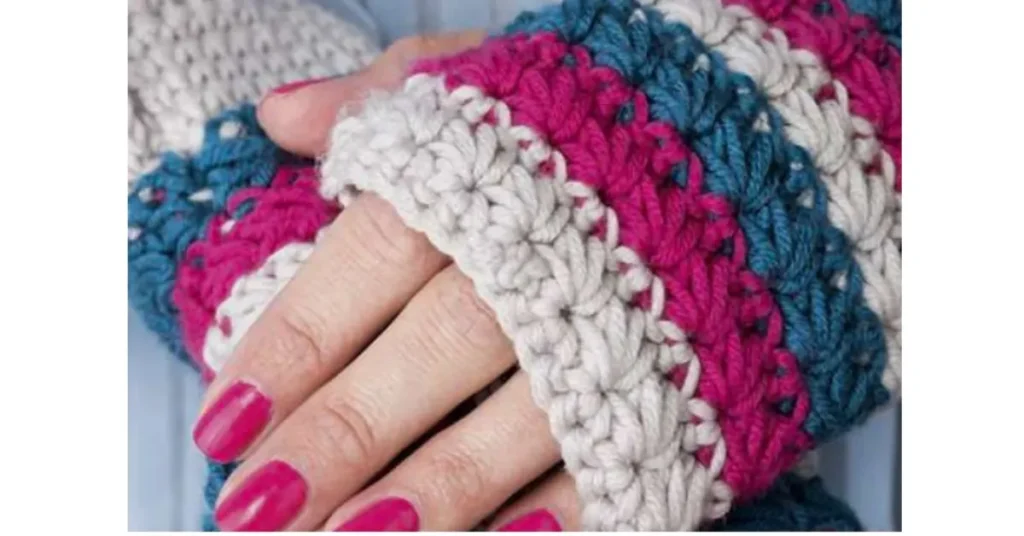
Step-by-Step Hand Crochet Accessories Pattern
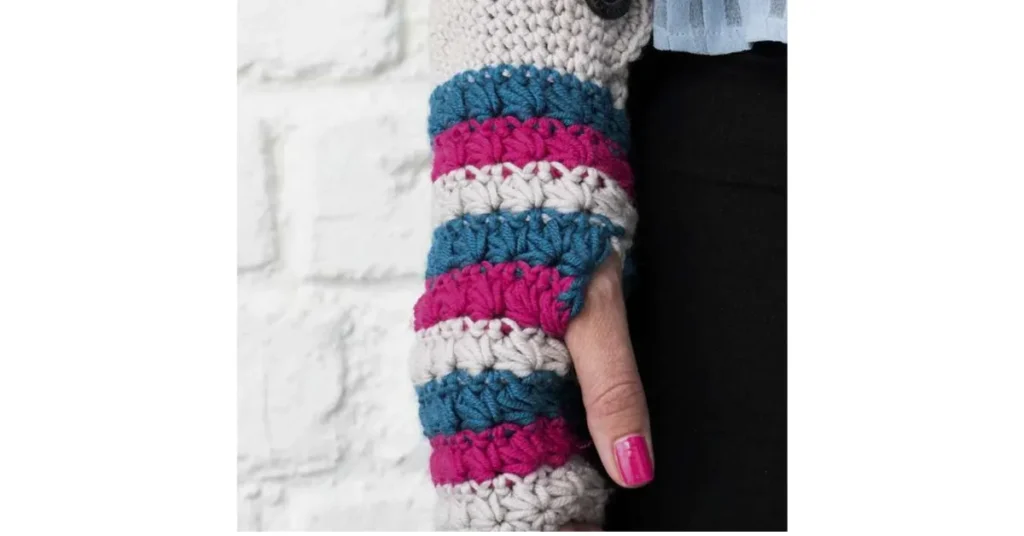
This crochet pattern will guide you through making a pair of warm and stylish mitts. The mitts consist of two sections: the cuff (made with double crochet for a snug fit) and the main mitt section (featuring the textured star stitch for warmth and beauty).
A. Making the Cuffs
The cuff provides a stretchy and structured base for the mitts. It’s worked in the round using double crochet (dc) with Yarn C (Oat).
Pattern for Cuffs (Make 2)
Using Yarn C, ch 30.
Round1:
- Dc in the second ch from the hook and each ch across to the last ch.
- Work 4 dc in the last ch to create a rounded edge.
- Rotate your work and dc along the opposite side of the foundation chain, making sure to keep tension even.
- Work 3 dc into the same ch as the first dc, then slip stitch (ss) to the top of the first dc to join. (62 dc total)
Round2:
- Ch 1 (does not count as a stitch),
- 2 dc in the first stitch, dc in the next 27 stitches,
- 2 dc in each of the next 4 stitches,
- Dc in the next 27 stitches,
- 2 dc in each of the next 3 stitches, ss to join. (70 dc total)
Round3:
- Ch 1, dc in the first stitch, 2 dc in the next stitch,
- Dc in the next 27 stitches,
- (dc in next stitch, 2 dc in next stitch) 4 times,
- Dc in next 27 stitches,
- (dc in next stitch, 2 dc in next stitch) 3 times, ss to join. (78 dc total)
Round4:
- Ch 1, dc in the first 2 stitches, 2 dc in the next stitch,
- Dc in next 27 stitches,
- (dc in next 2 stitches, 2 dc in next stitch) 4 times,
- Dc in next 27 stitches,
- (dc in next 2 stitches, 2 dc in next stitch) 3 times, ss to join. (86 dc total)
Round5:
- Ch 1, dc in the first 3 stitches, 2 dc in the next stitch,
- Dc in next 27 stitches,
- (dc in next 3 stitches, 2 dc in next stitch) 4 times,
- Dc in next 27 stitches,
- (dc in next 3 stitches, 2 dc in next stitch) 3 times, ss to join. (94 dc total)
Fasten off and weave in the ends.
Why This Works:
The gradual increase in stitches creates a rounded shape that fits comfortably around the wrist while keeping it snug.
B. Crocheting the Main Mitt Section
Now that the cuffs are complete, we move on to the main mitts, worked in rows using the star stitch with Yarn B (Teal).
Pattern for Mitts (Make 2)
Using Yarn B, ch 31.
Row1 (RS):
- Dc in the second ch from the hook and each ch across, turn. (30 dc total)
- Fasten off.
Row2 (WS):
- Join Yarn B in the first stitch, ch 1 (does not count as a stitch).
- Dc in each stitch across, turn. (30 dc total)
Row3 (RS) – Start Star Stitch:
- Ch 3 (counts as first loop of the first star).
- Insert hook into the second ch from hook, pull up a loop.
- Insert hook into the next ch, pull up a loop.
- Insert hook into the next 2 stitches, pulling up a loop each time. (You should have 6 loops on hook.)
- Yarn over and pull through all 6 loops, ch 1 to close the star.
- Continue working star stitches across the row.
Row4 (WS) – Half-Double Crochet Row:
- Ch 2, hdc in the “eye” of each star stitch across.
- Turn.
Repeat Rows 3 and 4 until the mitt measures 22 cm (8.5 inches) in length.
- Secure your work and leave a lengthy tail for stitching purposes.
C. Finishing Touches
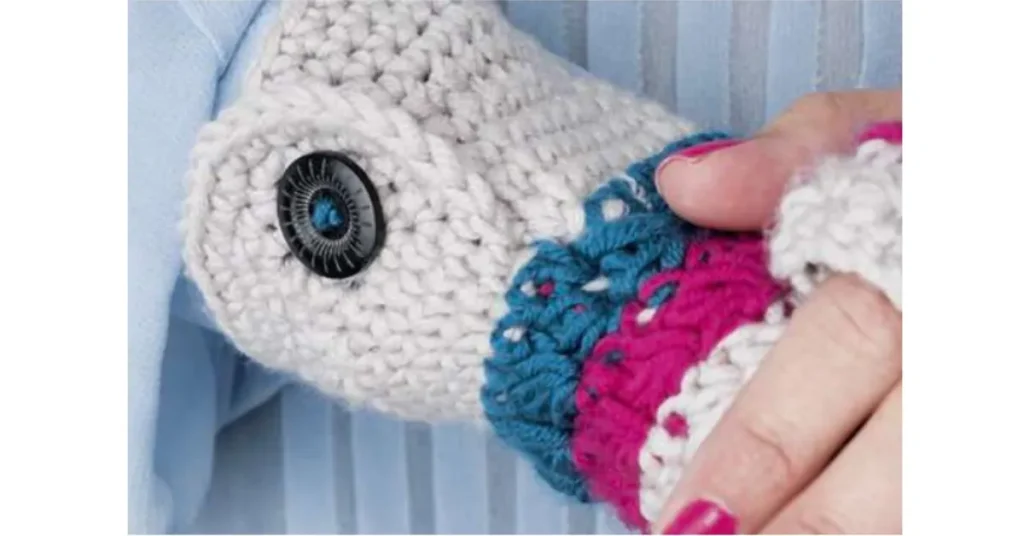
1. Sewing the Cuff and Mitt Together
- Align the cuff with the bottom edge of the mitt.
- Use a whip stitch or mattress stitch to sew them together, ensuring the seam is even.
- Make sure to leave a small thumb hole when sewing the side of the mitt together.
2. Adding Wooden Buttons
- Attach two wooden buttons (2 cm diameter) to the cuff.
- Position them for both style and functionality, making sure they sit comfortably on the wrist.
3. Final Shaping Tips
- Stretch the mitts slightly to relax the stitches and ensure a comfortable fit.
- Block the mitts using steam or gentle hand-washing to set the stitches in place.
Styling and Practical Uses
Crochet mitts are both functional and stylish, making them a versatile accessory for chilly weather. Here are some creative ways to wear them and customize them to match your personal style.
1. How to Wear Hand Crochet Accessories Mitts
Over Gloves for Extra Warmth
- If the temperature is extra cold, wear your crochet mitts over thin gloves for added insulation.
- This layering technique helps trap heat while keeping fingers mobile.
Wearing Them Alone
- These mitts are warm yet breathable, making them perfect for mildly chilly days when full gloves feel too bulky.
- Their fingerless design allows you to use your phone, write, or craft without restriction.
Office & Indoor Use
- Keep a pair in your office drawer to wear while typing or working on a computer.
- They help prevent stiff fingers caused by cold office air conditioning.
2. Customizing Your Hand Crochet Accessories Mitts
Want to make your mitts uniquely yours? Here are some fun ways to personalize them!
Change the Yarn Colors
- Swap Yarn B (Teal) for another shade to match your winter wardrobe.
- Try neutral tones (gray, beige) for an elegant look or bright colors (red, mustard) for a pop of color.
Experiment with Different Buttons
- Instead of wooden buttons, try:
- Vintage pearl buttons for a classic touch.
- Metal buttons for a rustic vibe.
- Handmade crochet buttons for an all-crochet aesthetic.
Add Embellishments
- Embroider small flowers or initials for a decorative touch.
- Sew a faux fur trim around the cuffs for extra warmth.
- Attach tiny beads or charms for a stylish accent.
3. More Practical Uses
Outdoor Activities: Wear them for autumn walks, driving, or quick errands.
Gifting: Handmade mitts make thoughtful and cozy presents for friends and family.
Craft Fairs & Selling: These are beginner-friendly, quick to make, and perfect for selling at craft markets.
With so many ways to style, customize, and use your mitts, they’ll quickly become a winter wardrobe staple!
Care Instructions for Your Crochet Mitts
Taking proper care of your crochet mitts made with merino wool will ensure they stay looking fresh and last for many winters. Follow these easy care tips to keep your hand crochet accessories in top condition.
1. Washing Your Merino Wool Mitts
Merino wool is delicate, so it’s essential to wash your mitts carefully:
Hand Wash Only
- Use lukewarm water (not hot) and mild wool detergent.
- Gently wash the mitts by soaking them in the water, then press the fabric (don’t wring or twist) to remove excess water.
Machine Washing (If Label Allows)
- If you opt for machine washing, set it to a gentle cycle with cold water to protect the delicate fibers and maintain the mitts’ softness. Put your mitts in a mesh bag to guard against snags and keep their shape.
Avoid Fabric Softeners
- Fabric softeners can damage the wool’s natural fibers. Stick to gentle wool detergents instead.
2. Drying Your Crochet Mitts
Air Drying
- Lay your mitts flat on a clean towel to air dry. Avoid hanging them, as this can distort their shape.
- Reshape the mitts gently as they dry to maintain their fit.
Avoid Direct Heat
- Never use a dryer or place them near direct heat (like radiators or the sun), as this can shrink or damage the fibers.
3. Storing Your Crochet Mitts
Proper storage is key to keeping your hand crochet accessories in excellent condition when not in use.
Store in a Cool, Dry Place
- Keep your mitts in a dry, cool environment to avoid any moisture that could cause damage.
- Use breathable fabric bags or bins to store them, preventing dust buildup.
Moth Protection
- Place cedar balls or lavender sachets in your storage area to deter moths from damaging the wool.
4. Preventing Pilling
Pilling is a common issue with wool, but it can be prevented and treated:
Avoid Friction
- Minimize rubbing or friction, as this can cause wool fibers to tangle and form pills.
- Store your mitts properly and avoid carrying them in bags with rough materials.
De-pilling
- Use a fabric shaver or wool comb to gently remove pills if they form.
5. Keeping Your Crochet Work Fresh
Spot Clean
- If a small stain appears, spot clean it with a damp cloth and mild detergent. Avoid soaking the entire mitt.
Rotate Use - If you have multiple pairs, rotate between them to give each pair time to rest, which helps reduce wear and tear.
By following these care instructions, you can ensure that your hand crochet accessories maintain their beauty, softness, and warmth for many winters to come!
Conclusion
Crocheting your own warm accessories for winter is not only a fun and creative project but also a practical way to stay cozy during cold weather. With this cold hand crochet pattern, you can make stylish and functional mitts that keep your hands warm while allowing for easy movement.
Whether you’re crafting for yourself, gifting a loved one, or adding handmade pieces to your winter wardrobe, these mitts are a great beginner-friendly project using merino wool and essential crochet techniques.
Now it’s your turn! Try this pattern and share your experience.
Comment below with your thoughts or any tips you discovered while making your mitts.
Share your creations on social media and tag us—we’d love to see your unique designs!
Stay warm and happy crocheting!