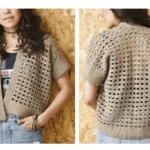
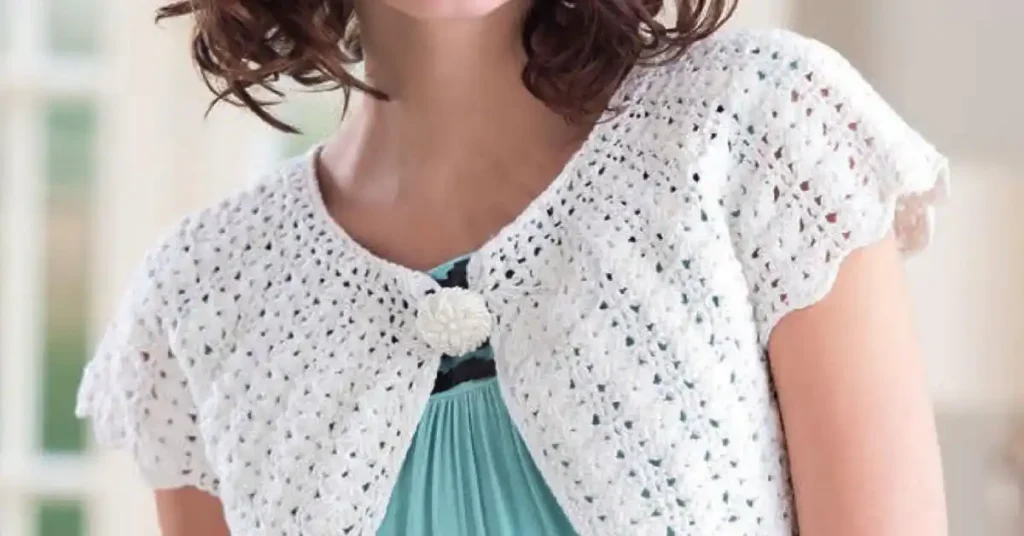
When the warm weather arrives, having the perfect crochet summer top can add both style and comfort to your wardrobe. This Crochet Summer Top Pattern is designed to be lightweight, breezy, and effortlessly stylish, making it an ideal piece for sunny days. Whether you’re heading to the beach, strolling through the park, or enjoying a summer brunch, this crochet bolero serves as a chic layering option over dresses, tank tops, or swimsuits.
This pattern features an airy and delicate stitch design, ensuring breathability while adding a touch of elegance. The open-front bolero style makes it easy to wear, offering a relaxed yet sophisticated look. Plus, it’s versatile and customizable—you can choose different yarn colors or add decorative elements to suit your personal style.
Even if you’re a beginner in crochet garment-making, this guide will help you through each step with clear instructions. Basic crochet techniques such as double crochet stitches and simple shaping are all you need to complete this stunning summer bolero. Get ready to craft a handmade, fashionable piece that you’ll love wearing all season long!
Table of Contents
- Why You’ll Love This Crochet Summer Bolero
- Materials & Tools Needed
- Stitches & Techniques Used
- Step-by-Step Crochet Bolero Pattern
- Customization & Styling Tips
- Common Mistakes & Troubleshooting
- Final Touches: Blocking & Care Instructions

Why You’ll Love This Crochet Summer Bolero
Creating your own crochet summer top is not just about crafting a stylish garment—it’s about making something unique, practical, and perfect for warm weather. Here’s why this crochet bolero pattern is a must-have addition to your summer wardrobe:
1. Stylish & Practical
This breezy bolero is designed for effortless layering, making it a versatile piece to wear over dresses, tank tops, or swimsuits. Whether you’re heading to the beach, a summer festival, or a casual day out, it adds a chic and elegant touch to any outfit.
2. Lightweight & Breathable
The use of cotton yarn ensures that this bolero remains cool and comfortable, even on the hottest days. The open stitch pattern allows for excellent airflow, keeping you feeling fresh while adding a delicate, feminine look.
3. Customizable Design
One of the best things about this pattern is its flexibility—you can make it in different colors, yarn textures, or sizes to suit your personal style. You can also adjust the sleeve length or add decorative edges for a unique touch.
4. Handmade & Sustainable
Crocheting your own bolero means embracing slow fashion and reducing waste. By using natural fibers like cotton or bamboo yarn, you create an eco-friendly, handmade piece that lasts for seasons to come.
5. Beginner to Intermediate Friendly
This pattern uses basic crochet stitches and follows a simple construction, making it accessible for beginners with some experience in garment-making. With step-by-step guidance, you’ll find it enjoyable and rewarding to create your very own stylish bolero!
Materials & Tools Needed
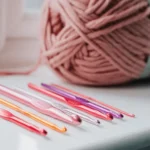
Before you start crocheting your stylish summer bolero, gather the right materials and tools to ensure a smooth and enjoyable experience. The right yarn, hook size, and accessories will help you achieve a lightweight, breathable, and well-shaped finished piece.
1. Yarn Choice: Debbie Bliss Eco Baby Cotton
For a comfortable and airy summer bolero, I recommend using Debbie Bliss Eco Baby Cotton. This yarn is:
- Lightweight & breathable, making it perfect for warm weather.
- Soft & gentle on the skin, ensuring all-day comfort.
- Eco-friendly & sustainable, aligning with the slow fashion movement.
- Available in various colors, so you can customize your bolero to match your personal style.
Alternatively, you can use any lightweight (sport or DK) cotton yarn with similar properties.
2. Hook Size: US E/4 (3.5mm)
A US E/4 (3.5mm) crochet hook is ideal for achieving a delicate yet structured fabric. If you tend to crochet tightly or loosely, you may need to adjust your hook size slightly to maintain the correct gauge.
3. Additional Supplies
- 1-inch button – Adds a stylish and functional closure to your bolero.
- Stitch markers – Helps with shaping armholes and keeping track of stitch counts.
- Scissors & yarn needle – Essential for weaving in ends and finishing touches.
- Blocking tools (blocking mats, pins, spray bottle) – These help shape the final piece for a professional-looking finish.
With these materials in hand, you’re all set to start crocheting your breezy summer bolero!
Stitches & Techniques Used
To create this stylish and breezy crochet summer bolero, you’ll use a combination of basic crochet stitches and shaping techniques. The pattern is simple yet elegant, making it a great project for those with basic crochet skills who want to experiment with garment-making.
1. Basic Stitches
These foundational stitches will form the main body of your bolero:
- Double Crochet (dc) – The primary stitch used throughout the pattern, giving the bolero a light and airy texture.
- 1-dc, 2-dc, and 3-dc Clusters – Used to create subtle texture and visual interest, keeping the bolero stylish while maintaining breathability.
2. Shaping Techniques
Shaping is important for achieving a well-fitted and comfortable bolero. The following techniques will help you create armholes and define the silhouette:
- Armhole Shaping – Strategic skipping of stitches and the use of stitch markers help form the armholes without compromising the bolero’s structure.
- Dc2tog (Double Crochet Two Together) – A simple decrease technique used to shape certain sections, such as the neckline or sleeves, for a flattering fit.
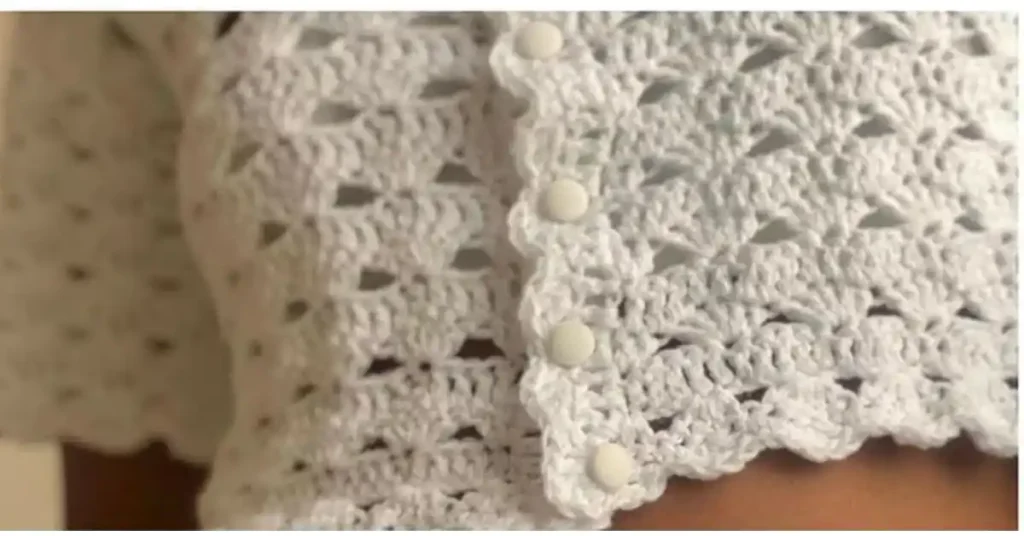
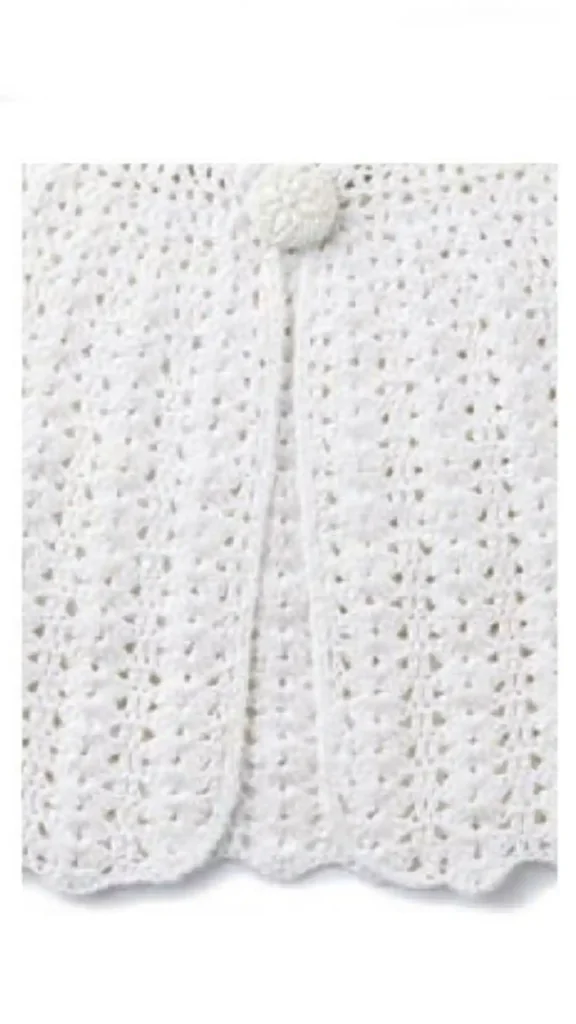
3. Edging & Finishing
The final touches will enhance the elegance of your crochet bolero:
- Lace Edging – A simple yet delicate lace border adds a feminine touch, making the bolero look polished and refined.
- Blocking – Once your bolero is complete, blocking is essential to shape the piece and ensure an even, professional finish. Use blocking mats and pins to set the stitches, enhancing the overall drape.
Mastering these stitches and techniques will help you create a chic, breathable bolero—perfect for layering over summer outfits!
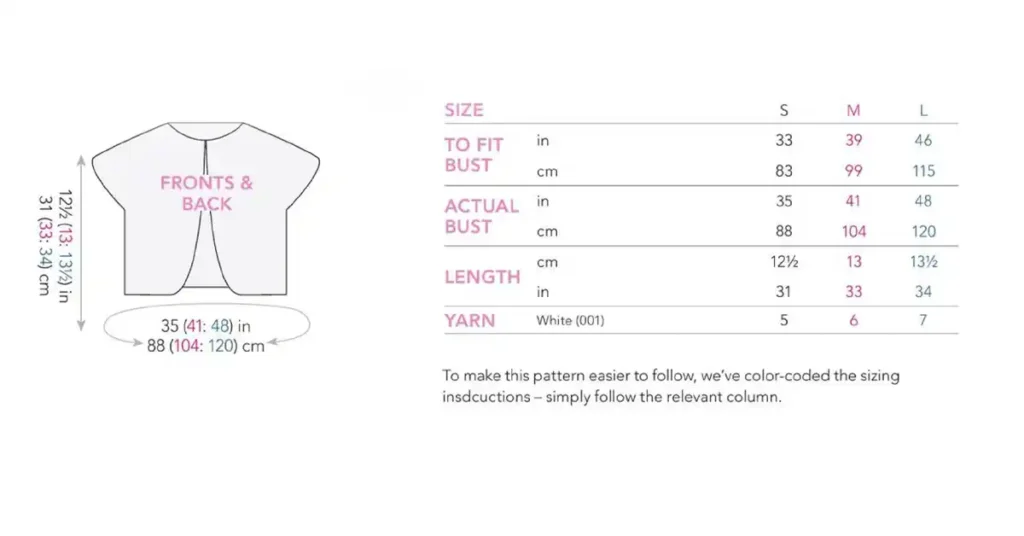
Step-by-Step Crochet Bolero Pattern
Follow this detailed guide to crochet your stylish and breezy summer bolero. This step-by-step breakdown will help you create a comfortable, well-fitted piece that’s perfect for layering over summer outfits.
Step1: Creating the Foundation
- Start with the Back Panel
- Begin by making a foundation chain that matches the width of your back (usually 80-100 chains, depending on your size).
- Ensure the number of stitches is a multiple of 4 for the lace edging later.
- Work Double Crochet Rows
- Chain 3 (counts as the first double crochet), then work double crochet (dc) stitches across each row.
- Continue for 10-12 inches (25-30 cm) or until the panel reaches the desired length for your bolero.
Step2: Shaping the Front Panels
- Splitting the Front Panels
- Once the back panel is complete, divide the stitches in half to create left and right front panels.
- Use stitch markers to ensure symmetry.
- Adding Decorative Clusters
- Work 1-dc, 2-dc, or 3-dc clusters to add texture and an openwork effect.
- Keep crocheting each panel separately for 6-8 inches (15-20 cm) until they are long enough to reach the front of your body.
Step3: Forming the Armholes
- Creating the Arm Openings
- To shape the armholes, use dc2tog (double crochet two together) at the edges to taper the fabric slightly.
- This ensures a comfortable, well-fitted armhole that isn’t too tight.
- Maintaining Symmetry
- Use stitch markers to track the start and end points of each armhole opening.
- Work in even rows, keeping both sides identical.
Step4: Assembling the Bolero
- Seaming the Side Panels
- Fold the bolero and sew the side seams, leaving space for the armholes.
- Use a yarn needle and the whip stitch for a neat and flexible seam.
- Adding the Front Closure
- Sew a 1-inch button at the top of one front panel.
- Leave a small loop of chain stitches on the opposite panel to fasten the button securely.
Step5: Adding the Edging
- Crocheting the Lace Border
- Work a simple lace stitch around the neckline, front edges, and bottom hem for a delicate, airy look.
- A common edging pattern: single crochet (sc), chain 3, skip 2 stitches, sc in the next stitch.
- Customization Options
- Add picot stitches for extra texture.
- Use a contrasting color for the border to make it pop.
With these steps, your crochet summer bolero will be lightweight, stylish, and perfect for warm days!
Customization & Styling Tips
Your crochet summer bolero is versatile and can be easily customized to match your personal style and needs. Here are some ways to modify the design and style it effortlessly.
1. Choose Different Yarn
The choice of yarn can significantly impact the look and feel of your bolero. While cotton yarn is ideal for breathability, consider these alternatives for different effects:
- Bamboo yarn – Soft, silky, and eco-friendly, perfect for a drapey summer bolero.
- Linen yarn – Lightweight and durable, providing a crisp, structured look.
- Lightweight wool – Ideal for cooler summer evenings or transitional seasons.
2. Adjust the Fit
Every crocheter has a different preference when it comes to fit. Here’s how you can customize your bolero for the perfect size:
- Larger fit – Increase the foundation chain count and work more rows for added coverage.
- More fitted look – Decrease stitches in the front panels and shape the waist with dc2tog (double crochet two together).
- Longer sleeves – Extend the armhole and add extra rows to create short or three-quarter-length sleeves.
3. Styling Ideas
A crochet bolero is a fantastic layering piece for summer outfits. Here’s how to wear it:
- Over a summer dress – Adds a touch of elegance while providing light coverage.
- With a tank top and shorts – A casual and breezy everyday look.
- As a swimsuit cover-up – A stylish and breathable layer for beach days.
4. Color Choices
The color of your bolero can change its entire vibe. Some great choices include:
- Neutral tones (beige, white, or gray) – Versatile and timeless, ideal for mixing and matching.
- Pastel shades (mint, peach, or lavender) – Soft and feminine for a delicate summer look.
- Bold colors (red, cobalt blue, or emerald green) – Make a statement and add a pop of color to your outfit.
With these customizations, your crochet summer bolero will be a truly unique and stylish addition to your wardrobe!
Common Mistakes & Troubleshooting
Even with a well-written crochet pattern, small mistakes can happen. Here’s how to fix common issues when making your crochet summer bolero.
1. Uneven Stitches?
✅ Issue: The stitches look inconsistent, making the fabric bumpy.
🔹 Fix:
- Maintain consistent tension while crocheting.
- If your tension is too loose or too tight, switch to a different hook size.
- Blocking the finished bolero will help even out the stitches.
2. Armholes Too Tight?
✅ Issue: The armholes feel restrictive and uncomfortable.
🔹 Fix:
- When shaping the armholes, add extra chains before joining.
- Use stitch markers to ensure symmetry on both sides.
- If the fit is still snug, try using a larger hook for the armhole section.
3. Lace Edging Curling?
✅ Issue: The lace border is curling instead of lying flat.
🔹 Fix:
- Use a larger hook size when working the edging to keep it relaxed.
- Try blocking the bolero with steam or wet blocking to shape the lace properly.
- Avoid tight tension when working decorative stitches like picots or shells.
4. Button Placement Issue?
✅ Issue: The closure doesn’t sit right, making the bolero uneven in the front.
🔹 Fix:
- Before sewing the 1-inch button, try pinning it in different positions and adjusting for a snug fit.
- If the front panels don’t align, double-check stitch counts on both sides.
- Consider using a loop closure instead of a buttonhole for more flexibility.
By troubleshooting these common issues, you’ll ensure your crochet summer bolero looks polished and fits comfortably!
Final Touches: Blocking & Care Instructions
Once you’ve completed your crochet summer bolero, the final steps will ensure it looks polished, fits well, and lasts a long time.
Blocking Your Bolero
Blocking is essential for shaping your crochet piece and giving it a professional finish.
Step1: Soak the Bolero
- Fill a basin with lukewarm water and add a mild detergent (optional).
- Submerge the bolero for 10–15 minutes, gently pressing out any air bubbles.
Step2: Lay Flat & Shape
- Gently squeeze out excess water (do not wring!).
- Lay the bolero on a blocking mat or clean towel.
- Use pins to stretch and shape the bolero to its correct dimensions, ensuring the edges are even.
Step3: Let It Dry
- Let the item air dry thoroughly before carefully taking out the pins.
- If needed, use a light steam iron (without touching the yarn) to smooth out any curling edges.
Washing & Maintenance
To keep your crochet bolero in top condition, follow these care tips:
Hand Wash Only
- Fill a sink with cold water and a gentle soap solution.
- Gently swish the bolero around, then rinse thoroughly.
Drying
- Lay the bolero flat on a towel to dry, reshaping as needed.
- Avoid hanging, as this can stretch out the stitches.
Storage
- Fold neatly and store in a drawer or shelf.
- If storing long-term, place in a breathable fabric bag to protect it from dust.
By following these steps, your handmade bolero will stay stylish, soft, and fresh for many summers to come!
Conclusion
Congratulations! 🎉 You’ve just completed your very own crochet summer bolero, a stylish and breezy layering piece perfect for warm weather. This pattern is not only beginner-friendly but also customizable, lightweight, and practical—a great addition to any summer wardrobe. Whether you choose soft neutrals or bold statement colors, your handmade bolero will be a unique and sustainable fashion piece you can proudly wear.
We’d love to see your finished creations! Share your crochet bolero on social media using #Crochetex and tag us for a chance to be featured. 💕
Looking for more crochet summer clothing patterns? Subscribe to our newsletter for free tutorials, exclusive patterns, and crochet tips straight to your inbox.