Introduction
Handmade gifts hold a unique charm, each one a personal creation filled with meaning. A crocheted little moon carries a personal touch that no store-bought present ever could—crafted with care, time, and love. Among the many delightful handmade ideas, crochet gifts have a timeless appeal. Whether it’s for a baby shower, birthday, or just a heartfelt surprise, a handmade crochet little moon brings warmth and thoughtfulness to every occasion.
That’s why amigurumi projects have become so popular. These adorable, soft, and often whimsical creations aren’t just fun to make—they’re little pieces of joy that you can share with your loved ones. From cute animals to sweet shapes, amigurumi is all about creativity and connection.
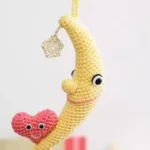
In this tutorial, I’ll show you how to create a crochet little moon amigurumi—complete with a tiny dangling star and a blushing heart. Soft, sweet, and full of character, this handmade moon gift makes the perfect keepsake or decorative piece. Whether you’re a seasoned crocheter or trying amigurumi for the first time, you’ll find this project both rewarding and easy to follow.
This crochet little moon amigurumi is the perfect handmade gift to show someone you care, crafted from yarn but filled with love.
Table of Contents
- Introduction
- Materials You’ll Need
- About the Project: Made with Love
- Crochet the Moon – Step-by-Step Instructions
- Make the Nose
- Crochet the Star
- Make the Heart with a Face
- Assembly and Finishing Touches
- Tips for Beginners
Materials You’ll Need
Before you start crocheting your adorable moon, make sure you have all the right materials and tools on hand. This project uses a mix of soft yarns and simple accessories to bring your amigurumi moon to life.
- Durable Coral yarn – Light yellow 309 (for the moon)
- Phildar Coton 3 yarn – Berlingot 76 (a soft pink for the heart)
- Durable Glam yarn – Cream 2172 (for the shimmering star)
- 2 mm and 3 mm crochet hooks
- Fiberfill stuffing – to give your moon its shape
- White safety eyes – 2 pieces of 6 mm and 2 pieces of 10 mm
- Darning needle – for assembling and finishing
- Blusher – to give the moon cheeks a rosy glow
With these basic tools and materials, you can craft a soft, cuddly, and charming crochet moon amigurumi.
About the Project: Made with Love

This crochet little moon amigurumi is more than just a craft—it’s a heartfelt message wrapped in yarn. Inspired by the phrase “LOVE U 2 the moon,” this sweet project makes a beautiful and sentimental gift for someone special. Whether you’re celebrating a new baby, sending a token of friendship, or creating a cute Valentine’s Day surprise, this handmade moon gift is sure to bring a smile.
With its soft colors, cheerful expression, and dangling star and heart, it also makes a charming addition to nursery décor or a cozy bedroom shelf. The finished moon measures approximately 7 x 15 cm, making it just the right size to cuddle or display.
Keep in mind: the project is worked mainly with a 3 mm crochet hook, but using thicker yarns or larger hooks will increase the moon’s size. This crocheted cute moon is truly a kawaii crochet moon creation made with love.
Crochet the Moon – Step-by-Step Instructions

This adorable crochet moon pattern is worked in the round using a 3 mm crochet hook and Durable Coral yarn in light yellow. We’ll start with a magic ring (MR) and gradually shape the moon with simple increases and decreases. Let’s break it down step by step!
1. Start with a Magic Ring (MR):
Make an MR and crochet 4 single crochet (sc) stitches into the ring. Pull it tight to close. This is the base of your moon.
2. Begin Increasing:
Work 2 sc in each stitch of the next round. Continue increasing in a spiral, following the pattern:
- Add sc evenly between increases to shape the moon.
- For example, you’ll go from 4 to 8 to 10, then 12, 14, and so on.
- Follow the stitch counts carefully for each round.
3. Add Definition with Decreases:
Start to shape the moon’s crescent by using sc2tog (single crochet 2 together). Important tip: work sc2tog only in the front loops—this keeps the shape neat and less bulky.
4. Stuff as You Go:
Use fiberfill stuffing to give your moon a soft, plump shape. Don’t wait until the end—add stuffing between rounds as the shape develops.
5. Eye Placement (Important!):
Once you reach Round 19, it’s time to add the safety eyes:
- Use 6 mm white safety eyes.
- Place them on the sides of Round 19.
- Count 6 stitches from the center for each eye.
- There should be 11 stitches between the eyes across the front.
Trim or cut any visible rods from the back of the eyes.
Continue following the round pattern, alternating increases and decreases, until your moon is fully shaped. At the end, fasten off with a long tail, weave through the last few stitches, and pull tight to close.
With this amigurumi moon tutorial, you’ve just created the body of your sweet little moon—great job!
Make the Nose
To complete your crochet moon with a heart, let’s add a cute little nose! Use the same yellow yarn (Durable Coral) and a 2 mm hook for a tighter finish.
Nose Pattern:
- Round 1: MR, 4 single crochet (sc)
- Round 2: 2 sc in each stitch (8)
- Round 3: sc in each stitch around (8)
- Round 4: sc2tog x 4 (4)
Fasten off and leave a long tail for sewing.
For the nose placement on the moon, sew it neatly between the eyes, centered and just below the eye line.
Crochet the Star

This adorable star adds a magical touch to your crochet moon tutorial. Use gold yarn and a 2 mm crochet hook to keep the stitches tight and defined.
Star Pattern:
- Round 1: Make a magic ring and crochet 5 single crochet (sc) into it.
- Round 2: 2 sc in each stitch (10).
- Round 3: (In next stitch: 1 hdc, 1 dc, 1 hdc), sl st in next stitch — repeat 5 times to form star points.
For this easy amigurumi project, create a chain of 6 stitches from the top point to hang it from the moon. Leave a long yarn tail for later attachment.
This completes the crochet star and heart combo beautifully!
Make the Heart with a Face


To create this sweet addition to your kawaii amigurumi, use pink yarn, such as Phildar Coton 3 in Berlingot 76, for a soft, charming finish.
Begin with two identical “roundings” for the top lobes of the heart. Each is worked in the round using a magic ring, then shaped with increases and slight decreases. After both parts are complete, you’ll join them together to form the full 3D heart.
Tip: After joining, you’ll notice a small gap between the two “roundings.” Use the yarn tail and a darning needle to gently sew this space shut for a smooth, clean heart shape.
Before closing the bottom, insert fiberfill stuffing to plump it up. Then, attach 6 mm safety eyes evenly across the front and embroider a tiny smile with your pink yarn for a cheerful, friendly expression.
This smiling heart adds a lovely personal touch to your crochet little moon amigurumi and makes it even more special as a handmade gift.
Assembly and Finishing Touches

Once all your parts are ready, it’s time to bring your handmade moon ornament to life. Gently bend the moon into a crescent shape—this is easiest done by shaping as you go and reinforcing the curve with your fingers after stuffing is complete.
Sew the small nose onto the moon, aligning it with Round 18. Then, use black embroidery thread to stitch two small curved lines above the safety eyes for sleepy brows. With pink yarn, embroider a sweet smile across Round 23.
Next, use the yarn tail and chain you created earlier to attach the star to the tip of the moon. Sew it securely so it dangles playfully. Then, sew the heart with a face to the lower point of the moon—this adds the final loving detail to your amigurumi moon.
For a finishing touch, gently dab blusher on the cheeks to give your moon and heart a warm, rosy glow.
If you plan to use it as décor, you can also crochet a loop to hang your project: simply make a chain of 24 stitches, fasten off, and sew it to the top of the moon’s back.
Tips for Beginners
If you’re new to beginner crochet amigurumi, don’t worry—this sweet little moon project is a great place to start! Keep your yarn tension even throughout to avoid lumps or loose areas. Consistency in your stitches will help your amigurumi moon look polished and uniform.
To avoid miscounting, mark the beginning of each round. A simple stitch marker or a contrasting piece of yarn can be incredibly helpful. This is especially helpful when shaping the moon or placing features like the eyes.
For proper shaping, remember to work sc2tog in the front loop only as instructed. This small technique helps the crescent form more naturally and neatly.
Finally, use stitch markers or pins to test eye placement before attaching them permanently—this ensures your moon has just the right expression.
With these simple amigurumi tips, you’ll master how to crochet a moon in no time!
Final Thoughts + Call to Action
This crochet little moon amigurumi is more than just a craft project—it’s a heartfelt, handmade moon gift that brings joy, warmth, and a personal touch to anyone lucky enough to receive it. Whether it’s for a nursery, a best friend, or a Valentine’s surprise, this soft, smiling moon is sure to be cherished.
Feel free to customize your moon with different yarn colors, facial expressions, or even a little bow or hat to make it uniquely yours. Creativity is what makes handmade gifts so special!
We’d love to see your finished amigurumi! Share your creations on social media and tag us, or drop a photo in the comments below.
👉 Click here to download the printable pattern or PDF version to keep by your side as you crochet!