Introduction
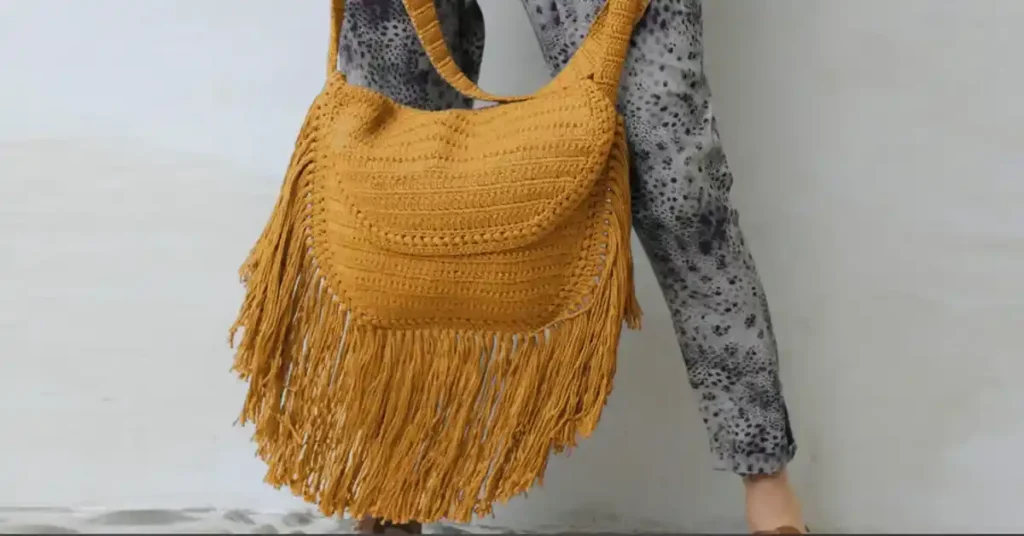
There’s something undeniably charming about carrying a handmade crochet handbag pattern, especially one with a touch of elegance and flair. With its soft texture, detailed stitching, and graceful fringe accents, this beautiful bag is more than just a functional accessory—it’s a statement piece. Whether you’re headed to brunch with friends or strolling through the city, this bag is designed to turn heads while keeping all your daily essentials in one stylish place.
What makes this project even better? It’s a free crochet handbag pattern that’s perfect for beginners and experienced crocheters alike. You’ll be amazed at how satisfying it is to bring this bag to life, one stitch at a time. From the fantasy stitch pattern to the chic fringe finish, this design offers just the right balance of creativity and practicality.
To get started, all you need are a few basic tools: Phildar Phil Coton yarn in Gold (9 balls), a 4 mm crochet hook, a wool needle, some stitch markers, and a bit of patience. Trust us—this crochet handbag pattern is one you’ll love to make and show off again and again.
Table of Contents
- Introduction
- Materials and Tools for Your Crochet Handbag
- Mastering the Crochet Techniques Used
- Gauge Swatch and Preparation Tips
- Crochet Handbag Pattern Instructions
- Finishing Touches – The Elegant Fringes
- Blocking and Sewing for a Polished Look
- Style Your New Crochet Handbag with Confidence
Materials and Tools for Your Crochet Handbag
Before you dive into creating your new favorite accessory, make sure you have all the essential tools and materials on hand. This project is designed to be beginner-friendly, so you don’t need any fancy or hard-to-find items—just a few basics that every crocheter should have in their kit.
Here’s what you’ll need:
- Phil Coton yarn (4 Gold – 9 balls): A soft and durable cotton yarn that gives your handbag structure while keeping it lightweight and comfortable to carry.
- 4 mm crochet hook: The perfect size for working with Phil Coton yarn to achieve the right gauge and stitch definition.
- Wool needle: Essential for weaving in your ends and sewing pieces together neatly.
- Stitch markers: These will help you track your rows and keep your stitches aligned, especially during increases and decreases.
- Pins: These are useful for shaping and holding panels in place before sewing.
- Spray bottle & water: Needed for blocking your finished panels, ensuring they hold their shape.
All of these tools are perfect for beginners.
Mastering the Crochet Techniques Used
This elegant handbag gets its charm and texture from a few key crochet stitches. Whether you’re a beginner or need a quick refresher, here’s a breakdown of the techniques you’ll use to complete this project.
Stitch Guide

- Double crochet (dc): A common stitch that creates height and soft drape in your work.
- Single crochet (sc): A tight, compact stitch that adds structure—used here for joining panels and finishing the flap.
- Chain stitch (ch): This is the base of your project, utilized to start each row and form gaps within the pattern.
Symbols used:
+= double crochetX= single crochet>= chain stitch
Special Stitch Patterns
- dc2tog (2 double crochets fastened off together):
Yarn over, insert your hook into the stitch, pull up a loop, yarn over again, and then pull through two loops on the hook. Repeat in the next stitch. Yarn over and pull it through all three loops that are on your hook. - dc3tog (3 double crochets fastened off together):
Similar to dc2tog, but done over three stitches. Ends with four loops on the hook, pulled through together. - Cluster stitch:
Yarn over, insert hook in same stitch and draw up a long loop — repeat this 3 times. Yarn over and pull through six of the seven loops that are on your hook. Next, yarn over again and pull through the last two loops.
These techniques come together in a beautifully textured fantasy stitch, which gives the handbag its unique, eye-catching look.
Gauge Swatch and Preparation Tips
Before starting your crochet handbag, it’s essential to make a gauge swatch to ensure your finished bag turns out the correct size and shape. Gauge helps you match the designer’s stitch and row count, which affects the bag’s structure and fit.
For this pattern, the recommended gauge is:
Using a 4 mm crochet hook, 29 stitches and 19 rounds will yield a length of 20 cm
Using a 2.5 mm hook, work 10 rounds of double crochet to achieve a length of 10 cm.
If your swatch is too tight or too loose, try adjusting your hook size or tension. Maintaining even tension while crocheting is essential for achieving a polished finish.
Tip for beginners: Practice your stitches on scrap yarn before working on the actual project. This helps build confidence and consistency in your technique.
Crochet Handbag Pattern Instructions
Follow this detailed, step-by-step guide to bring your crochet handbag pattern to life. From textured panels to a sturdy strap and stylish fringe, each part comes together beautifully with a bit of patience and creativity.
Front Panel
Start by making a loose chain of 26 stitches with the fantasy stitch. This will form the foundation of your bag’s front side.
- Step 1: Chain 26 using your 4 mm crochet hook.
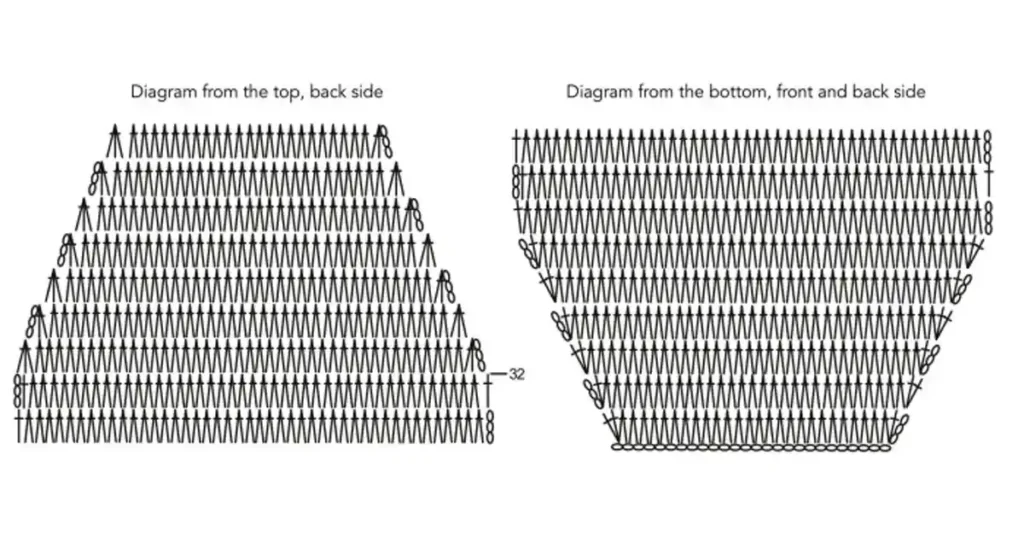
- Step 2: Increase stitches following the diagram until you have 46 stitches in total.
- Step 3: Work in fantasy stitch (using dc2tog and dc3tog across rows) for 21 rounds.
- Step 4: Once your work reaches a total height of 22 cm, fasten off.
This panel gives the bag its signature texture and shape, thanks to the fantasy stitch’s unique visual appeal.
Back Panel
The back panel begins just like the front, but adds shaping as you go.
- Step 1: Chain 26 and increase to 46 stitches following the same method as the front.
- Step 2: Continue with the fantasy stitch until you reach 22 cm height (21 rounds).
- Step 3: At this point, place stitch markers at the edge stitches.
- Step 4: Crochet straight (no increases) until you reach 34 cm height (32 rounds).
- Step 5: Begin reducing stitches following the outlined counting pattern. This tapering forms the back flap.
- Step 6: Work decreases until only 25 stitches remain, finishing at a total height of 41 cm (39 rounds). Fasten off.
Shoulder Strap
For a strong and even strap that holds its shape, you’ll work in simple double crochet.
- Step 1: Chain 9 stitches.
- Step 2: Crochet in double crochet (dc) across the chain.
- Step 3: At the beginning of each round, chain 3 to count as the first dc.
- Step 4: Continue working in dc for 120 rounds, or until your strap measures 120 cm in total.
- Step 5: Fasten off, making sure the strap width stays consistent.
This strap gives the bag both comfort and durability, making it perfect for everyday use.
Assembly
Now it’s time to bring all your efforts together and complete the bag.
- Step 1: Position the front and back panels with their wrong sides touching
- Step 2: Use pins to align the edges neatly, especially at the sides and bottom.
- Step 3: With your 4 mm hook, crochet one round of single crochet (sc) through both layers, joining them securely. Work this all along the sides and bottom.
- Step 4: Continue the round of sc around the flap to give it a clean, polished edge.
- Step 5: Sew the ends of the shoulder strap to the inside top corners of the front panel, about 3 cm deep for strength.
This step-by-step crochet bag construction ensures a clean, sturdy, and stylish finish. Whether you’re assembling the front and back panels, crafting the crochet shoulder strap, or closing it all together, you’ll see how each section flows into the next.
Now that the main structure is done, it’s time to add a fun, fashionable detail: fringes—we’ll cover that in the next section!
Finishing Touches – The Elegant Fringes
The final detail that elevates this bag from handmade to high-fashion is the addition of crochet fringes. These delicate strands add movement, personality, and a dash of boho elegance to your design.
- Cut four pieces of yarn, each measuring 50 cm, for each fringe.
- You’ll need a total of 65 fringes to complete the look.
- Fold each set of threads in half and attach them to the second round of single crochet (sc) along the front panel using a lark’s head knot.
- Once all fringes are attached, trim them evenly to 22 cm for a clean, uniform finish.
This fringe detailing gives the handbag its signature flair—perfect for turning heads wherever you go. It’s a simple yet eye-catching way to complete your elegant crochet design.
Blocking and Sewing for a Polished Look
To give your handmade bag a clean and structured finish, take time to block your crochet pieces before final assembly. Lightly dampen each panel using a spray bottle and water, then pin them flat to shape. Let them dry completely—this process helps smooth edges and sets the shape perfectly.
Once blocked, align the front and back panels, ensuring the edges match. Then, sew the ends of the shoulder strap about 3 cm deep into the inside of the front panel for a strong, balanced hold.
Taking care during these last steps ensures your bag has a secure, professional-looking finish. Whether you’re giving it as a gift or carrying it proudly yourself, proper crochet finishing, spray blocking, and careful sewing make all the difference in the final result.
Style Your New Crochet Handbag with Confidence
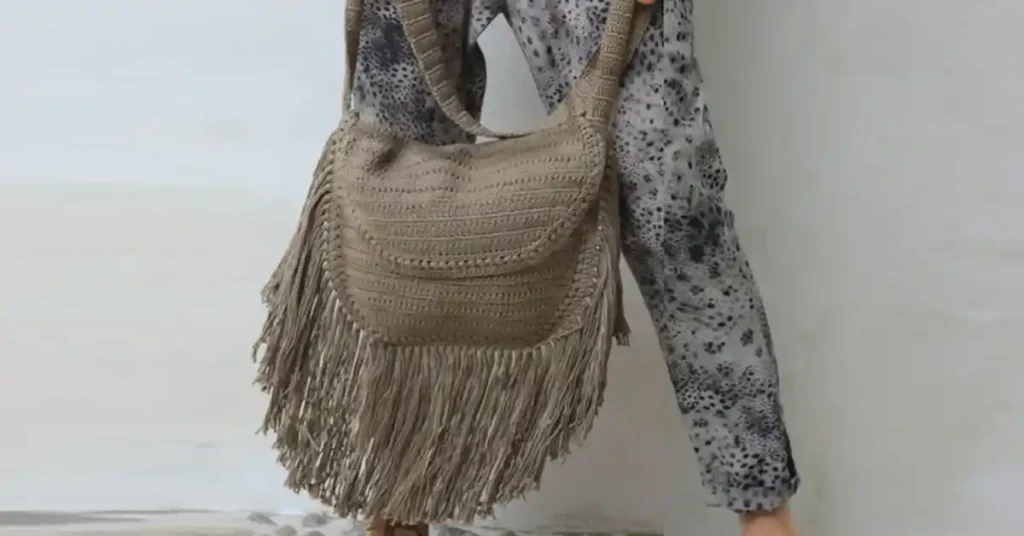
Your new crochet handbag pattern isn’t just a craft project—it’s a stylish and functional accessory perfect for various occasions. Whether you’re headed out for a casual outing, spending a day at the beach, or enjoying a city stroll, this bag is designed to complement any look. Its unique texture and fringes make it an eye-catching addition to your wardrobe.
Want to make it even more personal? Experiment with different yarn colors to match your style or the season. You could also add a fabric lining for extra durability or adjust the strap length if you prefer a shorter option. These simple customizations will make your bag uniquely yours.
This crochet handbag isn’t just about looks—it’s practical, spacious, and ready to hold all your essentials. You’ll love using it day after day.
We can’t wait to see what you’ve made! Post a photo of your completed crochet handbag on social media and be sure to tag us! Show off your own version or any customizations you’ve made.
For extra flair, consider pairing your new bag with other DIY crochet accessories, such as a matching scarf or crochet earrings, for a complete look!