Introduction
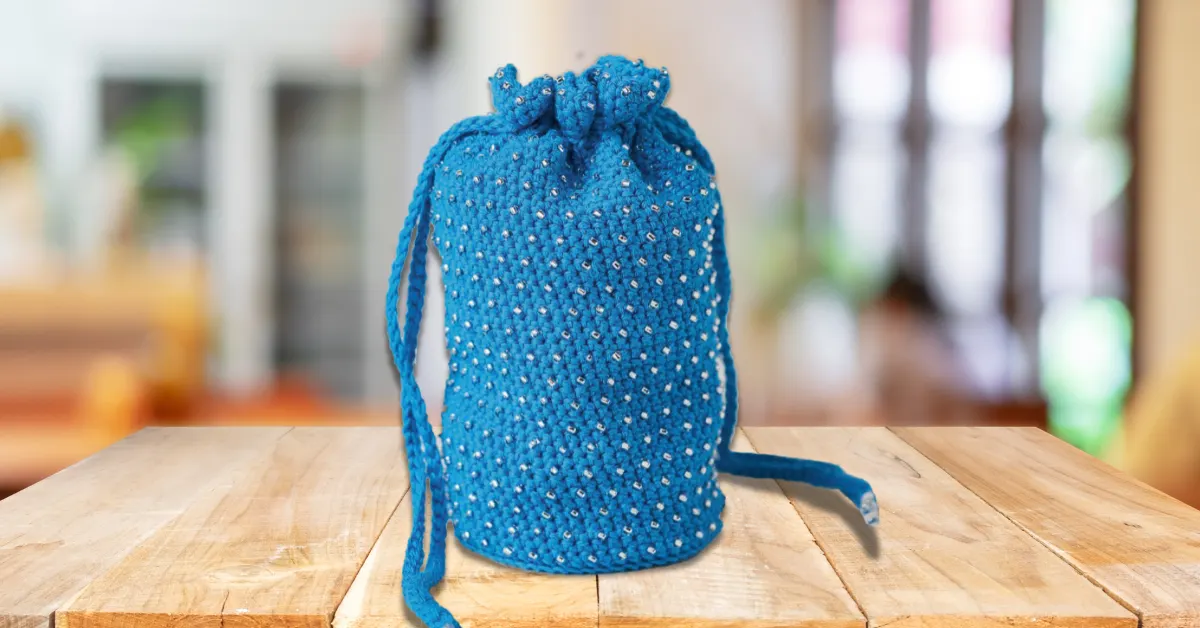
Are you ready to create a beautiful, handmade accessory that’s both functional and fashionable? A crochet bag pattern is the perfect way to combine your love for crochet with a stylish, one-of-a-kind accessory. In this guide, we’ll walk you through every step of making a stunning beaded crochet bag using Scheepjes Catona yarn and Debbie Abrahams seed beads. This crochet bag pattern is designed to help you craft a sophisticated piece that’s sure to catch the eye.
The charm of this crochet bag pattern lies in its versatility. Whether you’re a beginner or an experienced crocheter, the pattern is designed to guide you with easy-to-follow instructions. By using Scheepjes Catona, a soft and durable mercerized cotton yarn, you’ll ensure your bag is not only beautiful but also long-lasting. The addition of seed beads brings an elegant touch, adding texture and sparkle to the bag’s design.
This crochet bag pattern is the perfect project for anyone looking to add a unique, handmade accessory to their wardrobe or create a thoughtful gift. Ready to start? Let’s dive into this detailed guide and craft a bag you’ll be proud to carry!
Table of Contents
- Materials You’ll Need
- Understanding the Crochet Techniques
- Step-by-Step Instructions for the Crochet Bag
- Rounds 1-10: Forming the Bag’s Bottom (Base)
- How to Make the Cords
- Final Touches and Personalization
- Tips and Troubleshooting
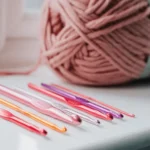
Materials You’ll Need
To create your beautiful beaded crochet bag, you’ll need the following materials. Each one has been carefully chosen to ensure your bag is both stunning and durable.
Scheepjes Catona Yarn
The foundation of this project is Scheepjes Catona, a 100% mercerized cotton yarn. This yarn is an ideal choice for crochet bags because of its softness, strength, and vibrant color options. For this project, you’ll use Vivid Blue (146), a striking shade that will give your bag a bold, yet sophisticated look. Mercerized cotton is also known for its durability, meaning your bag will maintain its shape and color over time. Whether you’re creating the bag for everyday use or as a special occasion piece, Scheepjes Catona ensures the perfect blend of texture and resilience.
Crochet Hook (2.75mm)
A 2.75mm (US C/2) crochet hook is used for this pattern to create the tight tension required to support the structure of the bag and hold the beads securely. The tight stitch work ensures that the beads sit neatly against the back of the bag while maintaining a firm, durable fabric. This specific size helps achieve the desired stitch definition and is perfect for working with Scheepjes Catona, so your bag will have a refined and professional finish.
Seed Beads (Debbie Abrahams, Size 8)
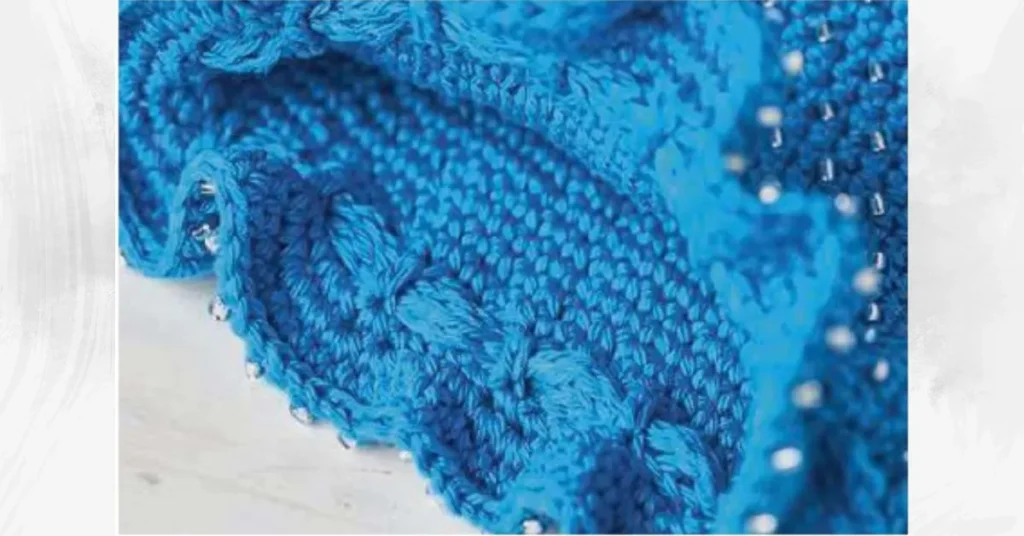
The beads used in this crochet bag pattern are Debbie Abrahams size 8 seed beads. These tiny, beautiful beads are perfect for adding texture, sparkle, and an extra layer of design to your bag. As you crochet, you’ll thread each bead onto the yarn to be placed in specific rounds, adding subtle elegance to the overall look. Before you begin crocheting, thread 630 beads onto your yarn using a fine needle and strong thread, creating a continuous loop of beads that will be easy to slide up as you incorporate them into the design. These beads will sit on the wrong side of the bag, creating a beautiful texture and visual interest on the right side.
Other Materials
- Fine Needle: To thread the beads onto the yarn before starting, you’ll need a fine needle. This will help you slide the beads onto the yarn smoothly without damaging the delicate cotton threads.
- Strong Thread: A strong, thin thread will be used to knot the ends of the bead strand to prevent them from slipping off. Make sure it’s sturdy enough to withstand the tension while threading the beads, but fine enough to allow the beads to pass smoothly onto the yarn.
With these materials in hand, you’re ready to start crocheting your beaded bag! These supplies work together to give you a high-quality result, from the sturdy, beautifully colored yarn to the sparkling beads that will elevate the final piece. Let’s move on to the next steps in bringing this crochet bag pattern to life!
Understanding the Crochet Techniques
Before we dive into the crochet bag pattern, let’s go over a few key crochet techniques that will be used throughout the project. These techniques are essential for creating a clean, seamless bag with the right tension and beautiful beaded details.
Magic Loop
The magic loop is a technique used to begin crocheting in the round, and it’s particularly helpful when making small, circular projects like the base of this crochet bag. This method allows you to create a tight, seamless start without any gaps in the center, which is perfect for forming a smooth foundation for your bag.
Why it’s used: The magic loop is ideal for this pattern because it eliminates any holes in the center of your work. Instead of chaining a set number of stitches to form a ring, you simply pull the working yarn through a loop to start your round, and as you crochet, the loop tightens, leaving no visible starting point. This ensures a clean, professional-looking base for your bag.
Double Crochet (dc) and Half Treble Crochet (htr)
Throughout this pattern, you’ll be using double crochet (dc) and half treble crochet (htr) stitches. Both of these stitches create a textured fabric, perfect for shaping your bag and giving it structure.
- Double Crochet (dc): This is the most commonly used stitch in the pattern. The double crochet stitch creates a tall, airy texture that gives the bag flexibility while also providing stability. You’ll be using this stitch throughout the majority of the bag to create the body and to work in rounds.
- Half Treble Crochet (htr): The half treble crochet is slightly taller than a half double crochet but shorter than a treble crochet. This stitch is used in the eyelet round (Rund 51) to create space for the cord to pass through the top of the bag. It gives the top of your bag a delicate, open appearance that allows for easy closure and a neat finish.
Beaded Crochet Technique
One of the most beautiful parts of this crochet bag is the incorporation of beads. Beaded crochet adds texture and visual interest, creating a truly unique piece.
Here’s how you’ll incorporate beads into your project:
- Prepare the beads: Before you start crocheting, thread 630 beads onto your yarn using a fine needle and strong thread. This allows you to slide the beads up the yarn as you crochet.
- Placing the beads: As you crochet, you will push each bead up the yarn and place it on the crochet hook right before making the stitch. When you complete the double crochet (dc) stitch, the bead will sit on the back side of the work, creating a decorative effect on the right side of the bag.
Why it’s done this way: This technique ensures that the beads are securely placed without getting in the way of your stitching. By pushing the beads to the back of the work, they will remain beautifully visible on the front without disrupting the stitch pattern. This method gives your bag a lovely, beaded texture that’s both elegant and eye-catching.
Tension and Gauge
While tension isn’t as critical for this project as it would be for a fitted garment, maintaining consistent tension is still important for achieving the best results.
Why it matters:
- Even stitches: Proper tension ensures that all your stitches are the same size, which will help maintain the bag’s shape and overall appearance.
- Beads placement: Even tension will ensure that the beads sit properly, creating a uniform look and preventing the bag from becoming too tight or too loose.
How to adjust your tension:
- If your stitches are too tight and difficult to work with, try switching to a larger hook. This will loosen the fabric and make the stitches easier to crochet.
- If your stitches are too loose, consider switching to a smaller hook to create a firmer fabric that will hold its shape.
Though tension is not the most crucial part of this project, maintaining a consistent and even stitch size will help make your beaded crochet bag look its best.
Step-by-Step Instructions for the Crochet Bag
Now that you’re familiar with the materials and techniques, it’s time to dive into the fun part: crocheting your beautiful beaded crochet bag! Below, you’ll find a detailed breakdown of each round, guiding you through the process of creating your bag’s base, adding beads for texture, and finishing off the top edge.
Rounds 1-10: Forming the Bag’s Bottom (Base)
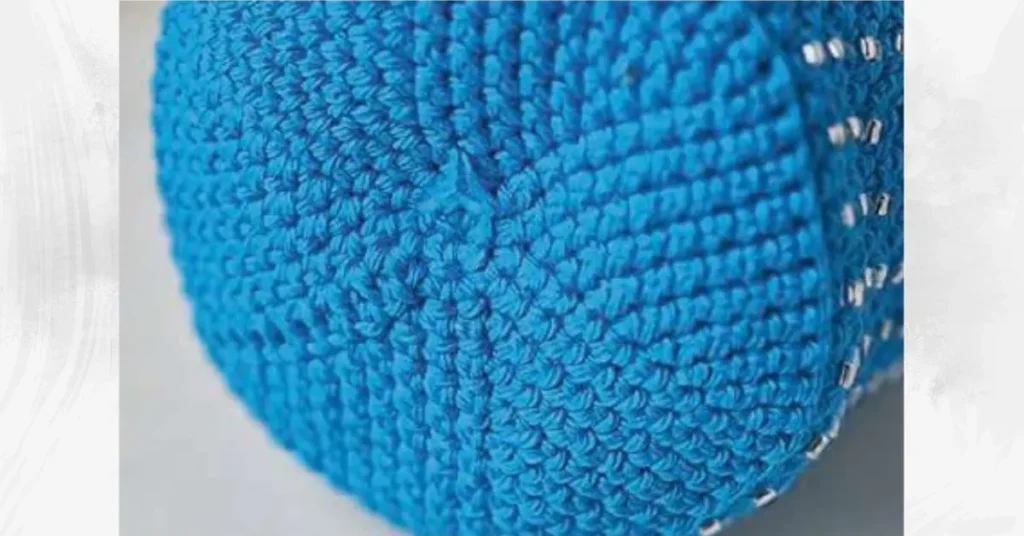
In these rounds, you’ll create the circular base of your crochet bag by working in the round. Each round includes increases to gradually expand the base and shape the bag.
Round1
- Start with a magic loop. Ch 1 (does not count as a stitch) and crochet 6 dc into the loop.
- Slip stitch (ss) to the first dc to close the round.
Stitch count: 6 sts
Round2
- Ch 1, crochet 2 dc into each dc around (this is an increase round).
- Slip stitch to the first dc to close the round.
Stitch count: 12 sts
Round3
- Ch 1, crochet 1 dc in the first dc, 2 dc in the next dc (repeat: 1 dc in next dc, 2 dc in next dc) 5 times.
- Slip stitch to the first dc to close the round.
Stitch count: 18 sts
Round4
- Ch 1, crochet 1 dc in the first 2 dc, 2 dc in the next dc (repeat: 1 dc in next 2 dc, 2 dc in next dc) 5 times.
- Slip stitch to the first dc to close the round.
Stitch count: 24 sts
Round5
- Ch 1, crochet 1 dc in the first 3 dc, 2 dc in the next dc (repeat: 1 dc in next 3 dc, 2 dc in next dc) 5 times.
- Slip stitch to the first dc to close the round.
Stitch count: 30 sts
Round6
- Ch 1, crochet 1 dc in the first 4 dc, 2 dc in the next dc (repeat: 1 dc in next 4 dc, 2 dc in next dc) 5 times.
- Slip stitch to the first dc to close the round.
Stitch count: 36 sts
Round7
- Ch 1, crochet 1 dc in the first 5 dc, 2 dc in the next dc (repeat: 1 dc in next 5 dc, 2 dc in next dc) 5 times.
- Slip stitch to the first dc to close the round.
Stitch count: 42 sts
Round8
- Ch 1, crochet 1 dc in the first 6 dc, 2 dc in the next dc (repeat: 1 dc in next 6 dc, 2 dc in next dc) 5 times.
- Slip stitch to the first dc to close the round.
Stitch count: 48 sts
Round9
- Ch 1, crochet 1 dc in the first 7 dc, 2 dc in the next dc (repeat: 1 dc in next 7 dc, 2 dc in next dc) 5 times.
- Slip stitch to the first dc to close the round.
Stitch count: 54 sts
Round10
- Ch 1, crochet 1 dc in the first 8 dc, 2 dc in the next dc (repeat: 1 dc in next 8 dc, 2 dc in next dc) 5 times.
- Slip stitch to the first dc to close the round.
Stitch count: 60 sts
These rounds will shape the base of your crochet bag, providing a strong foundation for the rest of the project.
Rounds 11-48: Beaded Crochet Rounds

Now that you’ve completed the base, you’ll begin working in the beaded crochet technique, where beads will be incorporated into your work for texture and shine.
- Round11:
Ch 1, crochet 1 dc in each dc around, and slip stitch to the first dc to join. This round sets the foundation for the beaded rounds.
Stitch count: 60 dc - Round12:
Ch 1, crochet 1 dc in the front loop only of each dc around, and slip stitch to the first dc to join. This creates a raised effect on the stitches, perfect for the beads to sit against. - Round13 (Beaded Round):
Ch 1, push a bead up the yarn until it is close to the back of the work, then crochet 1 dc in the next 2 dc (repeat this for 30 sts, placing beads as you go). After completing the round, slip stitch to the first dc to join.
The beads will sit on the back side of the work, creating a lovely texture and visual effect on the front. - Rounds 14-16:
Repeat Rund11 (for Rund14) and Repeat Rund13 (for Rund15). Then, continue alternating between these two rounds (Rund11 for plain rounds and Rund13 for beaded rounds) for a total of 8 more times (Rounds 17-48).In these rounds, you will continue to add beads in Rund13 and crochet regular rounds in Rund11. The beads will create a beautiful, textural pattern that makes the bag truly stand out.
Rounds 49-50: Creating the Eyelet Round

- Rund51 (Eyelet Round):
This round is where the bag’s top edge is created. Ch 3 (counts as a half treble crochet and chain), skip the next dc, and (htr in the next dc, ch 1, skip the next dc) 29 times. Finish by slip stitching to the first dc to close the round.
This round creates the eyelets where the cord will be threaded later. - Rund52:
Ch 1, crochet 1 dc in each htr and each ch around, and slip stitch to the first dc to join. This completes the structure for the top edge of your bag.
Rounds 51-55: Completing the Bag and Adding Beads to the Top
- Round53:
Ch 1, crochet 2 dc in each dc around, and slip stitch to the first dc to join. This round will help to reinforce the top edge of your bag, preparing it for the final steps. - Round54:
Ch 1, crochet 1 dc in each dc around, and slip stitch to the first dc to join. - Round55 (Beaded Round):
Push a bead up the yarn and crochet 1 dc in the next 2 dc, repeating 60 times. Fasten off and weave in your ends. This final beaded round will add the finishing touch to your bag, with beads outlining the top edge for an extra layer of elegance.
Finishing
Once you’ve completed the final rounds, it’s time to finish your bag:
- Fasten Off: Cut the yarn, leaving a small tail, and pull it through the last loop to secure it.
- Weaving in Ends: Use a yarn needle to weave in any loose ends from your work, ensuring everything is neat and tidy. This will also help secure any loose beads or stitches, ensuring that your bag is sturdy and durable.
- Add the Cords: Thread the cords through the eyelets you created in Rund51 and stitch the ends together, adding a loop of 12 beads at each end as a decorative touch.
And there you have it—a gorgeous, beaded crochet bag made with Scheepjes Catona yarn and Debbie Abrahams seed beads. Now you’re ready to show off your beautiful creation!
How to Make the Cords
Now that your crochet bag is complete, it’s time to finish it off with two elegant cords that will serve as the handles. These cords are simple to make but provide the perfect finishing touch to your bag.
Crochet the Cord
To create the cords, you’ll need to crochet two identical pieces. Here’s how to make each cord:
- Step 1:
Ch 120 (chain 120). The chain will form the base of your cord, which will be long enough to serve as the handle of your bag. The number of chains can be adjusted slightly depending on the length of the handle you prefer, but 120 chains is a good standard for this pattern. - Step 2:
Once you’ve completed the chain, turn your work and use slip stitches (ss) to crochet in each chain across. Slip stitch in each chain to form a solid, sturdy cord. This creates a smooth, flexible cord with a slight texture. - Step 3:
Fasten off the yarn once you’ve finished crocheting the slip stitches along the entire length of the cord. Leave a small tail to help secure the cord when attaching it to the bag.
Repeat this process for the second cord, ensuring both cords are the same length.
Attaching the Cord
Once your cords are ready, it’s time to attach them to your bag. This step will give your bag its functional, stylish handles, and the final loop of beads will add a decorative touch to complete the design.
Step 1: Thread the Cords through the Eyelets
- Take your first cord and thread it through the eyelets you created in Rund 5 of the pattern. The eyelets are evenly spaced around the top edge of your bag, and the cords will pass through these holes to form the handles. Carefully thread the cord all the way through, ensuring it sits neatly along the top edge of the bag. Tip: Position the cord so that it is even on both sides, ensuring the handle is centered on each side of the bag. This will give your bag a balanced and professional look.
Step 2: Add a Loop of 12 Beads
After threading the cord through the eyelets, it’s time to finish it off with the beaded detail. Take 12 beads from your bead stash and thread them onto the cord, creating a loop at each end. These beads will provide an elegant finishing touch and enhance the bag’s design. How to add the beads:
- Carefully thread the beads onto the cord, making sure they sit together in a smooth loop.
- Position the beads toward the end of the cord so that they form a decorative “end” to each handle.
- You can knot the end of the cord to secure the beads and ensure they stay in place.
Step 3: Secure the Cord
- Once the beads are added, stitch the ends of the cord together to secure them firmly in place. Use a strong thread or yarn to make a knot or sew the ends of the cord together, ensuring that they won’t slip out of the eyelets or unravel.Repeat this process for the second cord, making sure both cords are securely attached and have matching loops of beads.
Final Look and Positioning
When you’ve attached both cords and added the beaded loops, position them symmetrically on the bag to ensure an even, polished look. The cords should sit comfortably along the top edge, allowing the bag to be carried easily.
- Positioning the Cords:
The cords should be threaded through the eyelets at opposite sides of the top of the bag, ensuring that the handles are spaced evenly. Once attached, you’ll have a bag that’s not only functional but also beautifully embellished with the beads on the handles.
With the cords added and secured, your crochet bag pattern is now complete! The beads on the handles provide an extra layer of sparkle and texture, while the sturdy cords ensure the bag can be comfortably carried. Enjoy your beautiful, handmade accessory!
Final Touches and Personalization
Your beaded crochet bag is almost complete, but there are a few final touches you can add to make it truly unique and personalized. Whether you want to customize the bead design or add a fabric lining for extra durability, these finishing touches will elevate your creation.
Beaded Design: Customizing with Different Bead Colors and Embellishments
One of the easiest ways to make your crochet bag pattern your own is by playing with different bead colors or adding extra embellishments. Here are some ideas to personalize your beaded crochet bag:
- Experiment with Bead Colors:
Instead of the clear beads used in the original pattern, you can swap them out for beads in a variety of colors to match your personal style or the season. Choose metallic or matte beads for a modern, sleek look or go for bright, bold colors to make a statement. You can even create a gradient effect with beads that gradually change color as they wrap around the bag for a fun and dynamic look. - Create Patterns with Beads:
If you’re feeling creative, try adding patterns with the beads. For instance, you could create stripes or diagonal lines by alternating bead colors every few rounds, or create shapes like hearts or stars by positioning the beads in different spots. - Add Extra Embellishments:
- Charms or Tassels: Add small charm embellishments to the cords or even to the body of the bag for a cute, personalized touch. You could attach a small tassel made from yarn or thread to the base of the bag or at the ends of the cords.
- Appliqué Designs: For an even more intricate design, you can crochet small appliqué shapes (flowers, hearts, etc.) and sew them onto the bag for extra texture and decoration. This is a great way to make your bag truly one-of-a-kind!
- Metallic Threads or Ribbons:
You can even weave a metallic thread or ribbon through the bag’s body or handle for a little extra shine. This is a fantastic way to add a touch of elegance or festive flair to your bag.
Adding a Lining (Optional)
For those who want to take their crochet bag pattern to the next level, adding a fabric lining is a great way to improve durability and provide a more polished finish. Here’s how to line your bag:
Why Line Your Bag?
Adding a fabric lining provides extra structure, prevents the yarn from stretching, and ensures the inside of the bag looks just as neat as the outside. It also creates a smooth, finished edge that gives the bag a more professional look.
Choosing the Fabric:
When selecting fabric for the lining, pick something that complements your crochet design. For a colorful or patterned bag, consider using a neutral fabric like plain cotton or linen. For a minimalist design, you can add a pop of color with a fun, bold fabric that contrasts with your crochet bag’s color.
Cutting the Fabric:
Measure the inside dimensions of your crochet bag (the base, sides, and top), then cut the fabric to fit. You’ll want the fabric to be a little larger than the inside of the bag so it fits comfortably inside without pulling or bunching.
Sewing the Lining:
- Sewing the Fabric: Use a basic running stitch or a sewing machine to stitch the fabric together into a simple rectangular shape that fits inside the bag. Make sure to leave enough fabric at the top edge to fold over the lip of the bag.
- Attaching the Lining to the Bag: Once the fabric is stitched, carefully insert it into the bag, folding the top edge of the fabric over the top edge of the crochet work. You can hand-sew the fabric into place using invisible stitches, so the stitches won’t show on the outside of the bag.
Add Pockets (Optional):
For extra functionality, consider adding a small inner pocket to the lining. This is especially useful for keeping your phone, keys, or small essentials organized. Simply sew a small fabric rectangle onto the lining before inserting it into the bag.
Other Personalization Ideas:
- Monogram or Initials:
Add your initials or a small monogram to the front of your bag for a truly personal touch. You can stitch the initials with yarn or use an embroidery floss in a contrasting color to make it pop. - Adding Straps or Clasps:
If you want a more structured look, you could add a magnetic clasp or small strap to the top of the bag for a closure. This will add extra functionality and keep your items secure while adding a sleek finish to the design.
Tips and Troubleshooting
Here are some quick tips to avoid common mistakes and adjust the size of your bag.
Common Mistakes to Avoid
- Misplacing Beads: Keep track of bead placements by using stitch markers or counting stitches. Ensure beads sit on the wrong side of your work.
- Uneven Tension: If your tension is too tight or loose, adjust your grip or use a different hook size. Regularly check for even stitches.
- Crocheting Too Tight: Avoid pulling the yarn too tight around the beads, allowing them to sit naturally against the fabric.
- Forgetting Beads: Use stitch markers to help remember bead placements. If you miss one, you can always go back and add it later.
Adjusting the Size
- Making the Bag Larger:
Add extra rounds in the base (Rounds 1-10) to widen or lengthen the bag. Increase stitches in each round or add extra beaded rounds (Rounds 13-16) for height. - Making the Bag Smaller:
Reduce the number of increase rounds (stop after Round 6 or 8). Skip some beaded rounds if you want a shorter bag. - Adjusting Handle Length:
Increase or decrease the number of chains (120) when making the cords for longer or shorter handles.
Additional Tips
- Check Your Tension: Test a swatch first to ensure even stitches.
- Good Lighting: Work in bright light to avoid mistakes with beads.
- Organize Beads: Keep beads in small containers or zip-lock bags to prevent spilling.
With these tips, you’ll avoid common pitfalls and easily adjust your bag’s size for the perfect crochet project. Happy crocheting!
Conclusion
This crochet bag pattern is just the beginning! It’s a great foundation for unleashing your creativity. You can easily customize the pattern to make bags in different sizes, play with bead colors, or add your own unique embellishments—perfect for any occasion. Whether you’re crafting a chic everyday accessory or a thoughtful gift, the possibilities are endless.
Ready to get started with this crochet bag pattern? Grab your Scheepjes Catona yarn and let’s dive in! Don’t forget to share your finished creations with us on Instagram or in the comments below. We can’t wait to see how you make it your own! Happy crocheting!