Introduction
Meet Charlie Chestnut, an adorable and fun crochet mascot that will bring a touch of charm to your desk, car, or any space you choose! This amigurumi pattern is beginner-friendly, making it perfect for those new to crochet as well as experienced crafters looking for a quick and enjoyable project.
Standing at 8 to 10 cm tall, Charlie is the ideal desktop buddy or travel companion. With his cute little hat, soft body, and playful spines, he’s sure to become a favorite addition to your handmade plushie collection. Ready to bring Charlie to life? Let’s get started! 😊
Table of Contents
- Introduction
- Materials Needed
- Crochet Stitches & Techniques Used
- Step-by-Step Crochet Instructions
- Assembly & Finishing Touches
- Tips & Customization Ideas
- Final Thoughts
- Conclusion
Materials Needed

Before you start crocheting Charlie Chestnut, gather the following materials to ensure a smooth and enjoyable crafting experience:
- Yarn: Scheepjes Larra in four colors:
- Caramel (for the head and arms)
- Apple Green (for the body and hat)
- Dark Green (for the spines)
- Beige (for the face)
- Crochet Hook: 2mm
- Stuffing & Filling: Fiberfill for softness, with optional small pebbles or granules to add weight and stability
- Safety Eyes: 6mm (for a cute and expressive look)
- Other Tools:
- Scissors (for cutting yarn)
- Embroidery needle (for sewing pieces together)
- Stitch marker (to keep track of rounds)
With these supplies, you’re all set to create your cute and cuddly crochet companion!
Crochet Stitches & Techniques Used
Before you begin crocheting Charlie Chestnut, here are the essential stitches and techniques used in this pattern:
- Magic Ring (MR): This technique is used to start each piece seamlessly, creating a tight and adjustable center for your crochet rounds.
- Single Crochet (sc): The basic stitch used throughout the pattern to form the structure of Charlie’s body, head, arms, and hat.
- Back Post Single Crochet (bpsc): Used in the body section to create texture and shape. This stitch is made by inserting the hook around the post of the previous round’s stitch from back to front.
- Increase & Decrease (sc2tog):
- Increase: Crochet two single crochets into the same stitch to widen the piece.
- Decrease (sc2tog): Single crochet two stitches together to shape and taper parts like the head and body.
Mastering these basic stitches will make crocheting Charlie Chestnut a fun and rewarding experience!
Step-by-Step Crochet Instructions
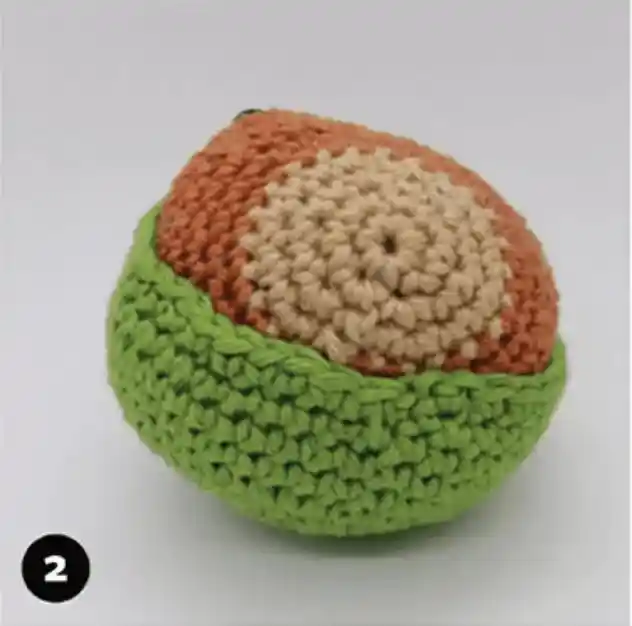
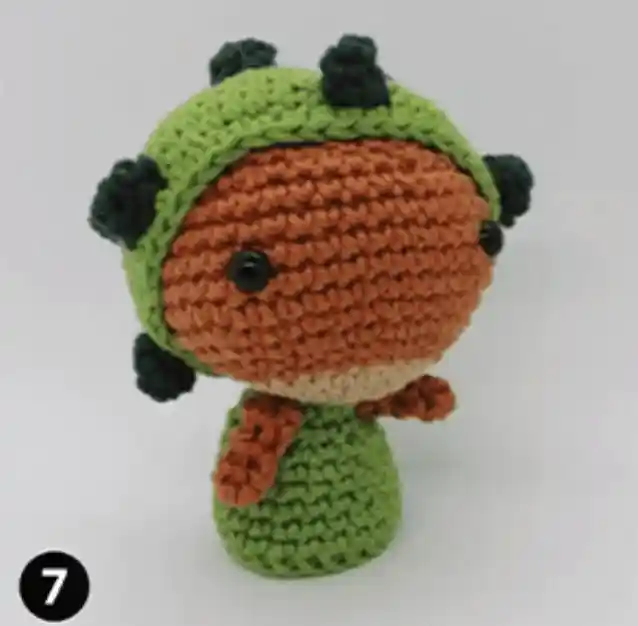
Head (Made with Beige and Caramel Yarn)
- Begin with Beige yarn and work in rounds using the magic ring (MR) technique.
- Gradually increase stitches to shape the head.
- Switch to Caramel yarn at the designated round to create the top of the head.
- Attach safety eyes in Round 11, leaving about 9 stitches between them.
- Stuff the head with fiberfill to give it a soft and firm shape.
- Continue decreasing until the opening is small, then fasten off and close securely.
Hat (Apple Green Yarn)
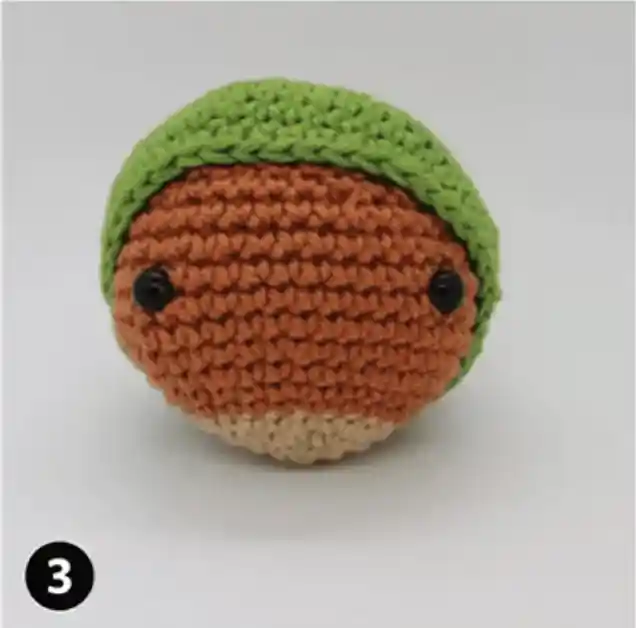
- Start with an MR and work in rounds to form a simple, rounded hat.
- Increase stitches evenly until reaching the desired size.
- Work a few rounds without increasing to shape the hat.
- Leave a long tail for sewing later.
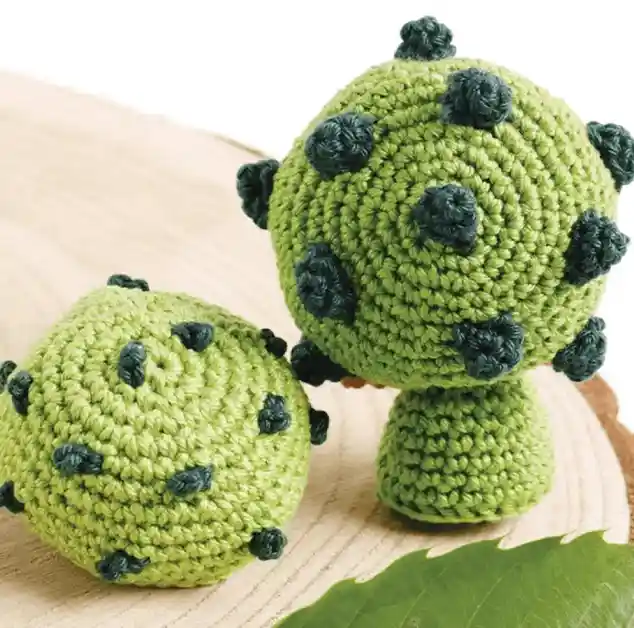
Body (Apple Green Yarn)
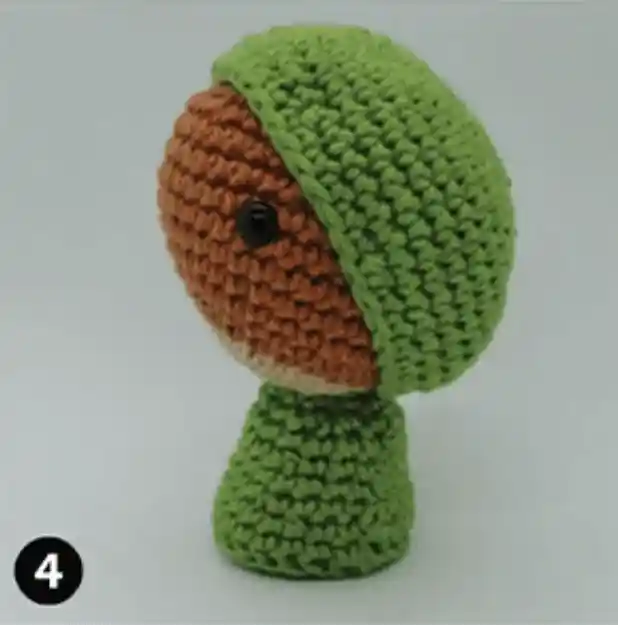
- Begin with an MR and work in rounds, gradually increasing to shape the body.
- Use back post single crochet (bpsc) in Round 5 to add texture and structure.
- Continue crocheting until the body is the right size.
- Fill the body with granules or pebbles for added stability.
- Do not close the body completely, leaving an opening for attaching the head.
Arms (Caramel Yarn)
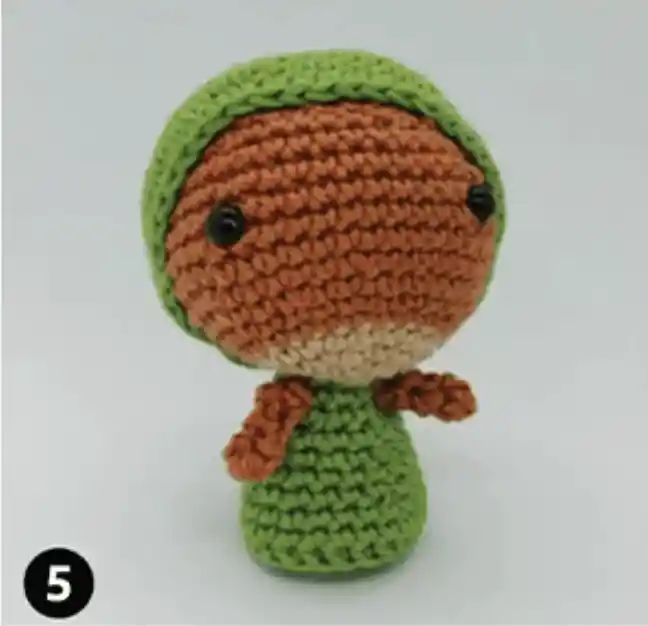
- Start with an MR and crochet small, cylindrical arms.
- Keep the arms unstuffed for a softer, more natural look.
- Fasten off, leaving a long tail for sewing.
Spines (Dark Green Yarn)
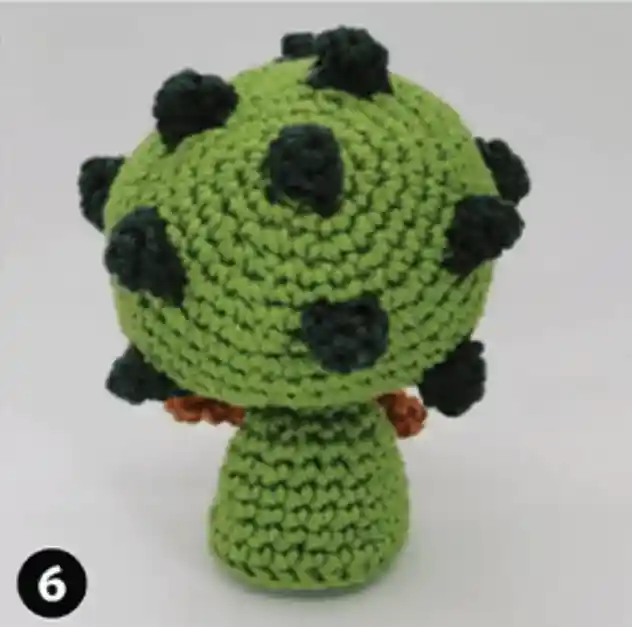
- Create 11 small spines using the magic ring technique.
- Keep them unstuffed to maintain a flexible and soft texture.
- Evenly distribute the spines around the head to achieve a cute, hedgehog-like effect.
Once these pieces are completed, you’ll be ready to assemble and bring Charlie Chestnut to life! 🎉🧶
Assembly & Finishing Touches
Now that all the crochet pieces are ready, it’s time to assemble Charlie Chestnut and add the final details!
- Attach the Head to the Body
- Position the head slightly tilted for a cute and dynamic look.
- Use the long yarn tail from the body to sew the head securely, making sure the stitches are tight and even.
- Sew on the Hat
- Place the hat at an angle, tilting slightly over the eyes.
- Use small, invisible stitches to secure the hat in place, ensuring it stays fixed.
- Attach the Arms
- Sew the arms on both sides of the body, slightly below the head.
- Make sure they are evenly positioned for a balanced look.
- Distribute and Sew the Spines
- Arrange the 11 spines evenly around the head, focusing on the back and top.
- Secure them with small stitches to keep them firmly in place.
Once everything is sewn together, give Charlie Chestnut a final fluff and adjust the details as needed. Now your adorable amigurumi pattern desktop buddy is ready to brighten up your space!
Tips & Customization Ideas
Want to make Charlie Chestnut even more special? Here are some fun ways to customize your amigurumi pattern buddy:
- Experiment with Different Yarn Colors
- Try lighter or darker shades for a unique twist.
- Use variegated yarn for a fun, multicolored effect.
- Add Embroidered Details for Extra Charm
- Stitch a tiny smile or eyebrows for a more expressive face.
- Add blush cheeks with a touch of pink yarn or fabric paint.
- Use Weighted Stuffing for Better Stability
- Fill the body with small pebbles or granules to keep Charlie standing upright.
- This makes him a great desktop paperweight as well!
Get creative and personalize Charlie Chestnut to match your style!
Final Thoughts
Crocheting Charlie Chestnut is a fun and rewarding project, perfect for both beginners and experienced amigurumi pattern enthusiasts. With its adorable design, simple stitches, and easy assembly, this little desktop buddy is sure to bring joy to your workspace or make a thoughtful handmade gift.
I’d love to see your version of Charlie Chestnut! 🧶✨ Share your finished creation on social media or your crochet blog, and don’t forget to tag me so I can admire your work.
Looking for more amigurumi patterns? Be sure to explore my blog for more creative crochet projects and inspiration. Happy crocheting!
Conclusion
In conclusion, Charlie Chestnut is the perfect crochet project to brighten up your day and your workspace! Whether you’re a beginner or an experienced crocheter, this adorable amigurumi pattern offers a fun and relaxing crafting experience. With a few simple materials and easy-to-follow instructions, you’ll have your very own desktop buddy in no time.
Remember to get creative with color choices and embellishments, and don’t forget to share your finished creation with the crochet community. I can’t wait to see how your Charlie Chestnut turns out!
Thank you for following along, and happy crocheting! 😊🧶